How to create your link in bio page
By Teja Vepakomma · Last updated
A link in bio page is one web page that holds all your important links: your website, portfolio, booking page, newsletter and social profiles. You put its address in your LinkedIn profile, Instagram bio or email signature, where there's room for only one link, and visitors pick the link they need. This guide walks you through setting up yours on ProfileLinkHub, from your first sign-in to sharing the finished page.
The short version: your page already exists. ProfileLinkHub creates it when you sign up, at an address like profilelinkhub.com/bio/your-name. The first time you sign in, a short setup walks you through your username, social icons, links, photo and background, a step at a time. Afterwards, change anything on the Design tab of your dashboard and press Save: every saved change is live right away.
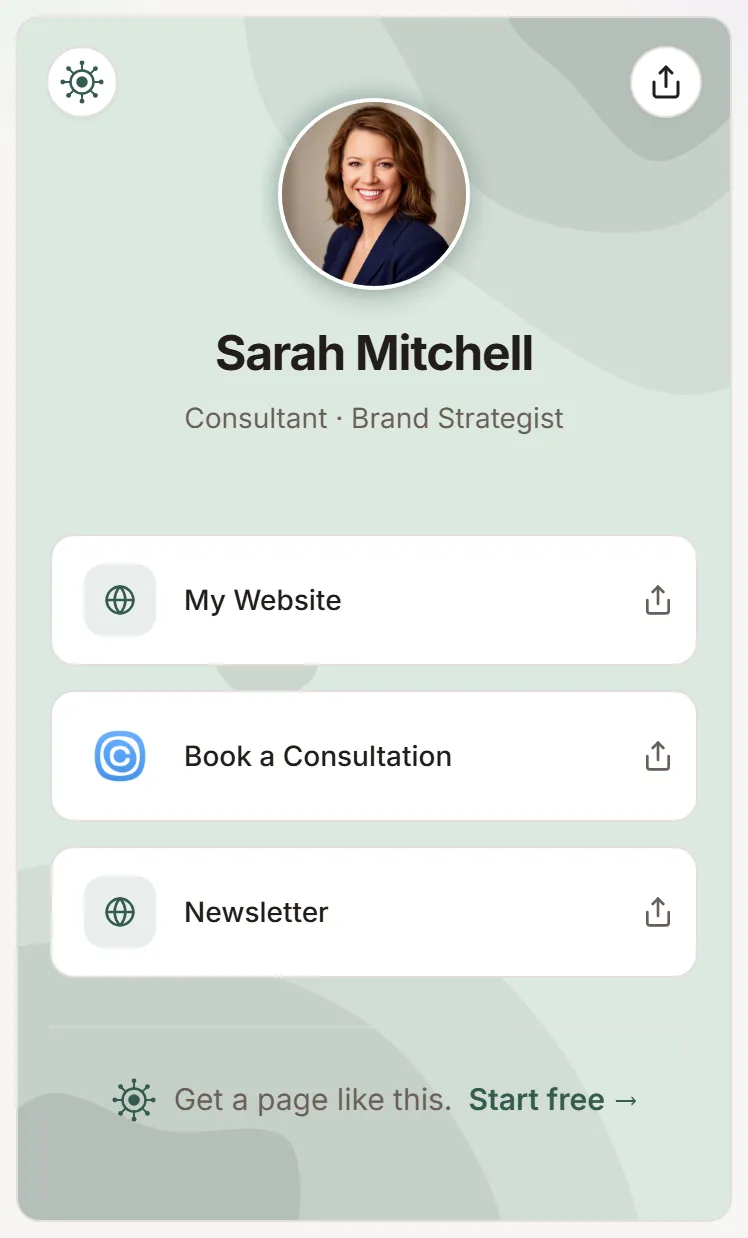
Here's the kind of page you'll have at the end. This one is our example page, for the demo account Sarah Mitchell (you can also see it live):
What you need
- A ProfileLinkHub account. If you don't have one yet, you can start free.
- About five minutes.
- The links you want to share, for example your website, a portfolio, a calendar booking link or your LinkedIn profile. Have their web addresses ready to paste.
- Optional: a photo of yourself or your logo. Square photos work best.
1. Sign in and set up your page
Sign in at profilelinkhub.com/login with LinkedIn, Google or your email address. The first time you sign in, a short setup opens before your dashboard. On a computer, the right side shows your page as it changes; on a phone, you see it at the end.
- Choose your username. This is the end of your page address, after
profilelinkhub.com/bio/. One made from your name is already filled in and marked Available. Keep it, type another, or tap one of the ideas below it. Then click Continue. - Which social platforms are you on? Tap every platform you use. Use the tabs (Social, Video, Work & writing, Messaging) to find one quickly. A page can have up to 12 icons.
- Add your links. Under Your usernames, type just your username for each platform you picked; the rest of the address is already there. Under Other links, paste the web addresses you want to share, like your website or booking page, and click Add Link for more. Each link is named after its website (for example "Calendly"); you can rename it later.
- Introduce yourself. Add your photo, your name and a short sub-header. If you signed up with LinkedIn or Google, your photo and name are already filled in.
- Choose a background. Pick a colour and a style, then click Publish my page.
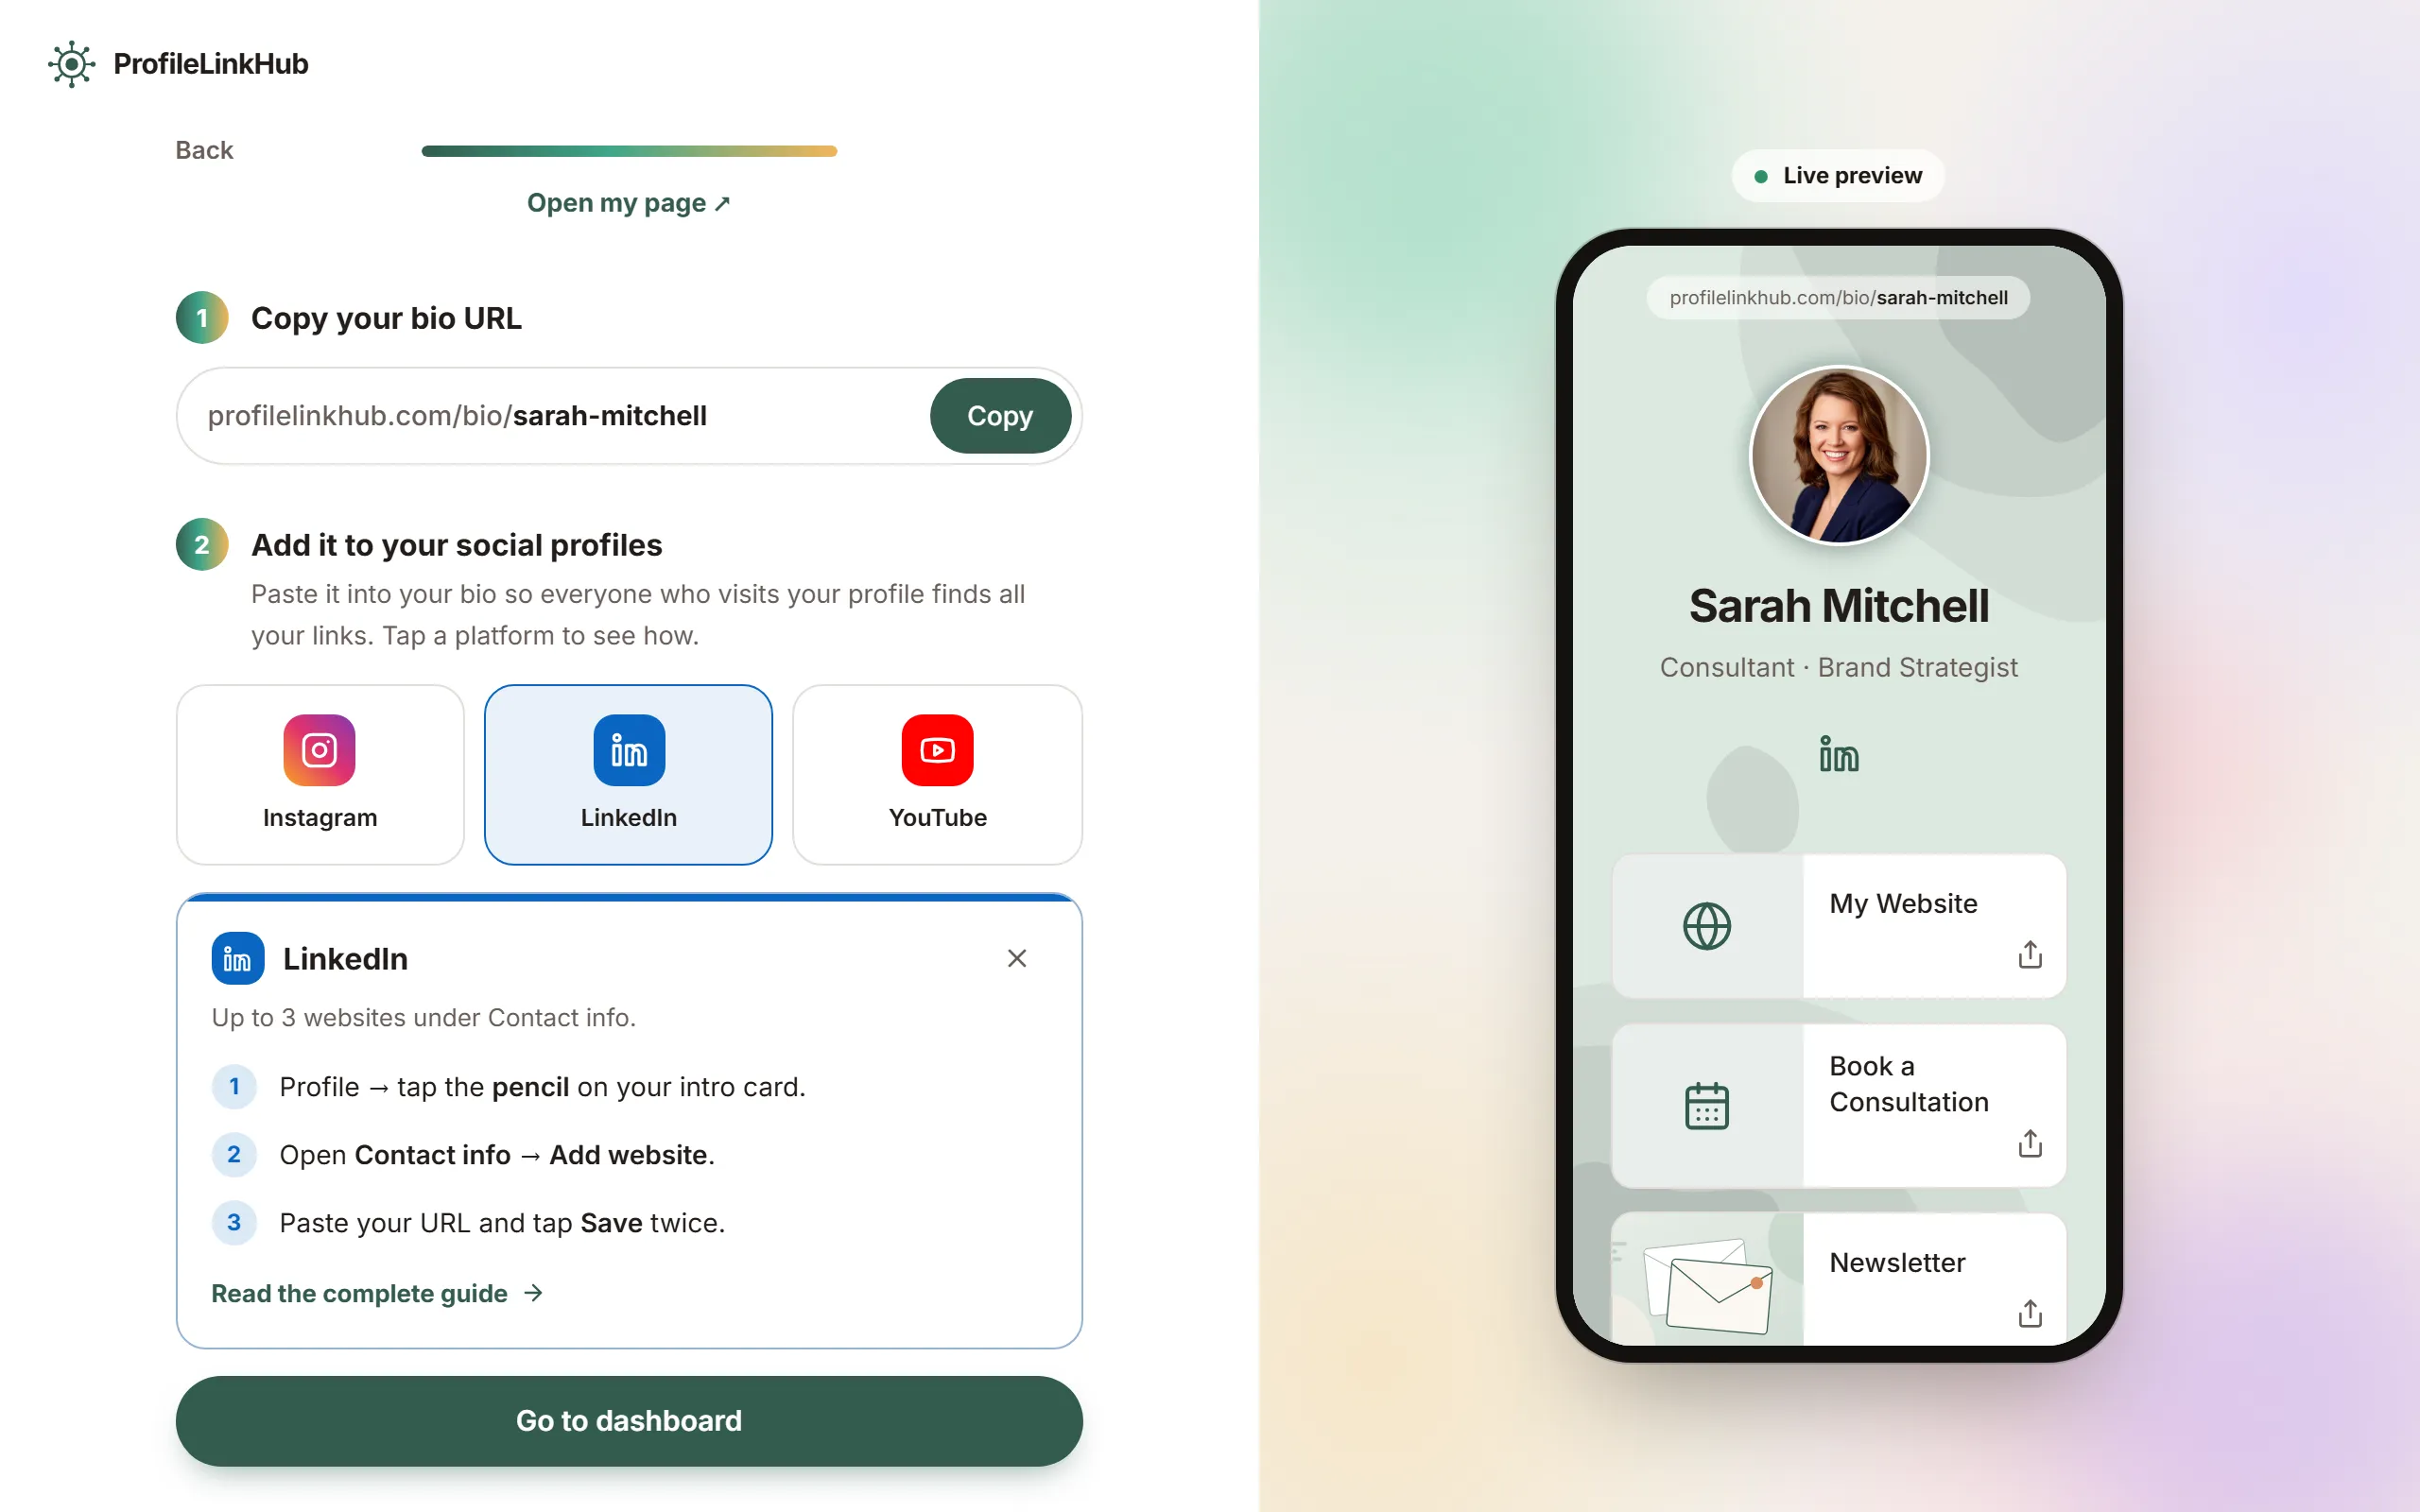
- You're live! Copy your page address and add it to your Instagram, LinkedIn or YouTube profile. Tap a platform to see the steps. Then click Go to dashboard.
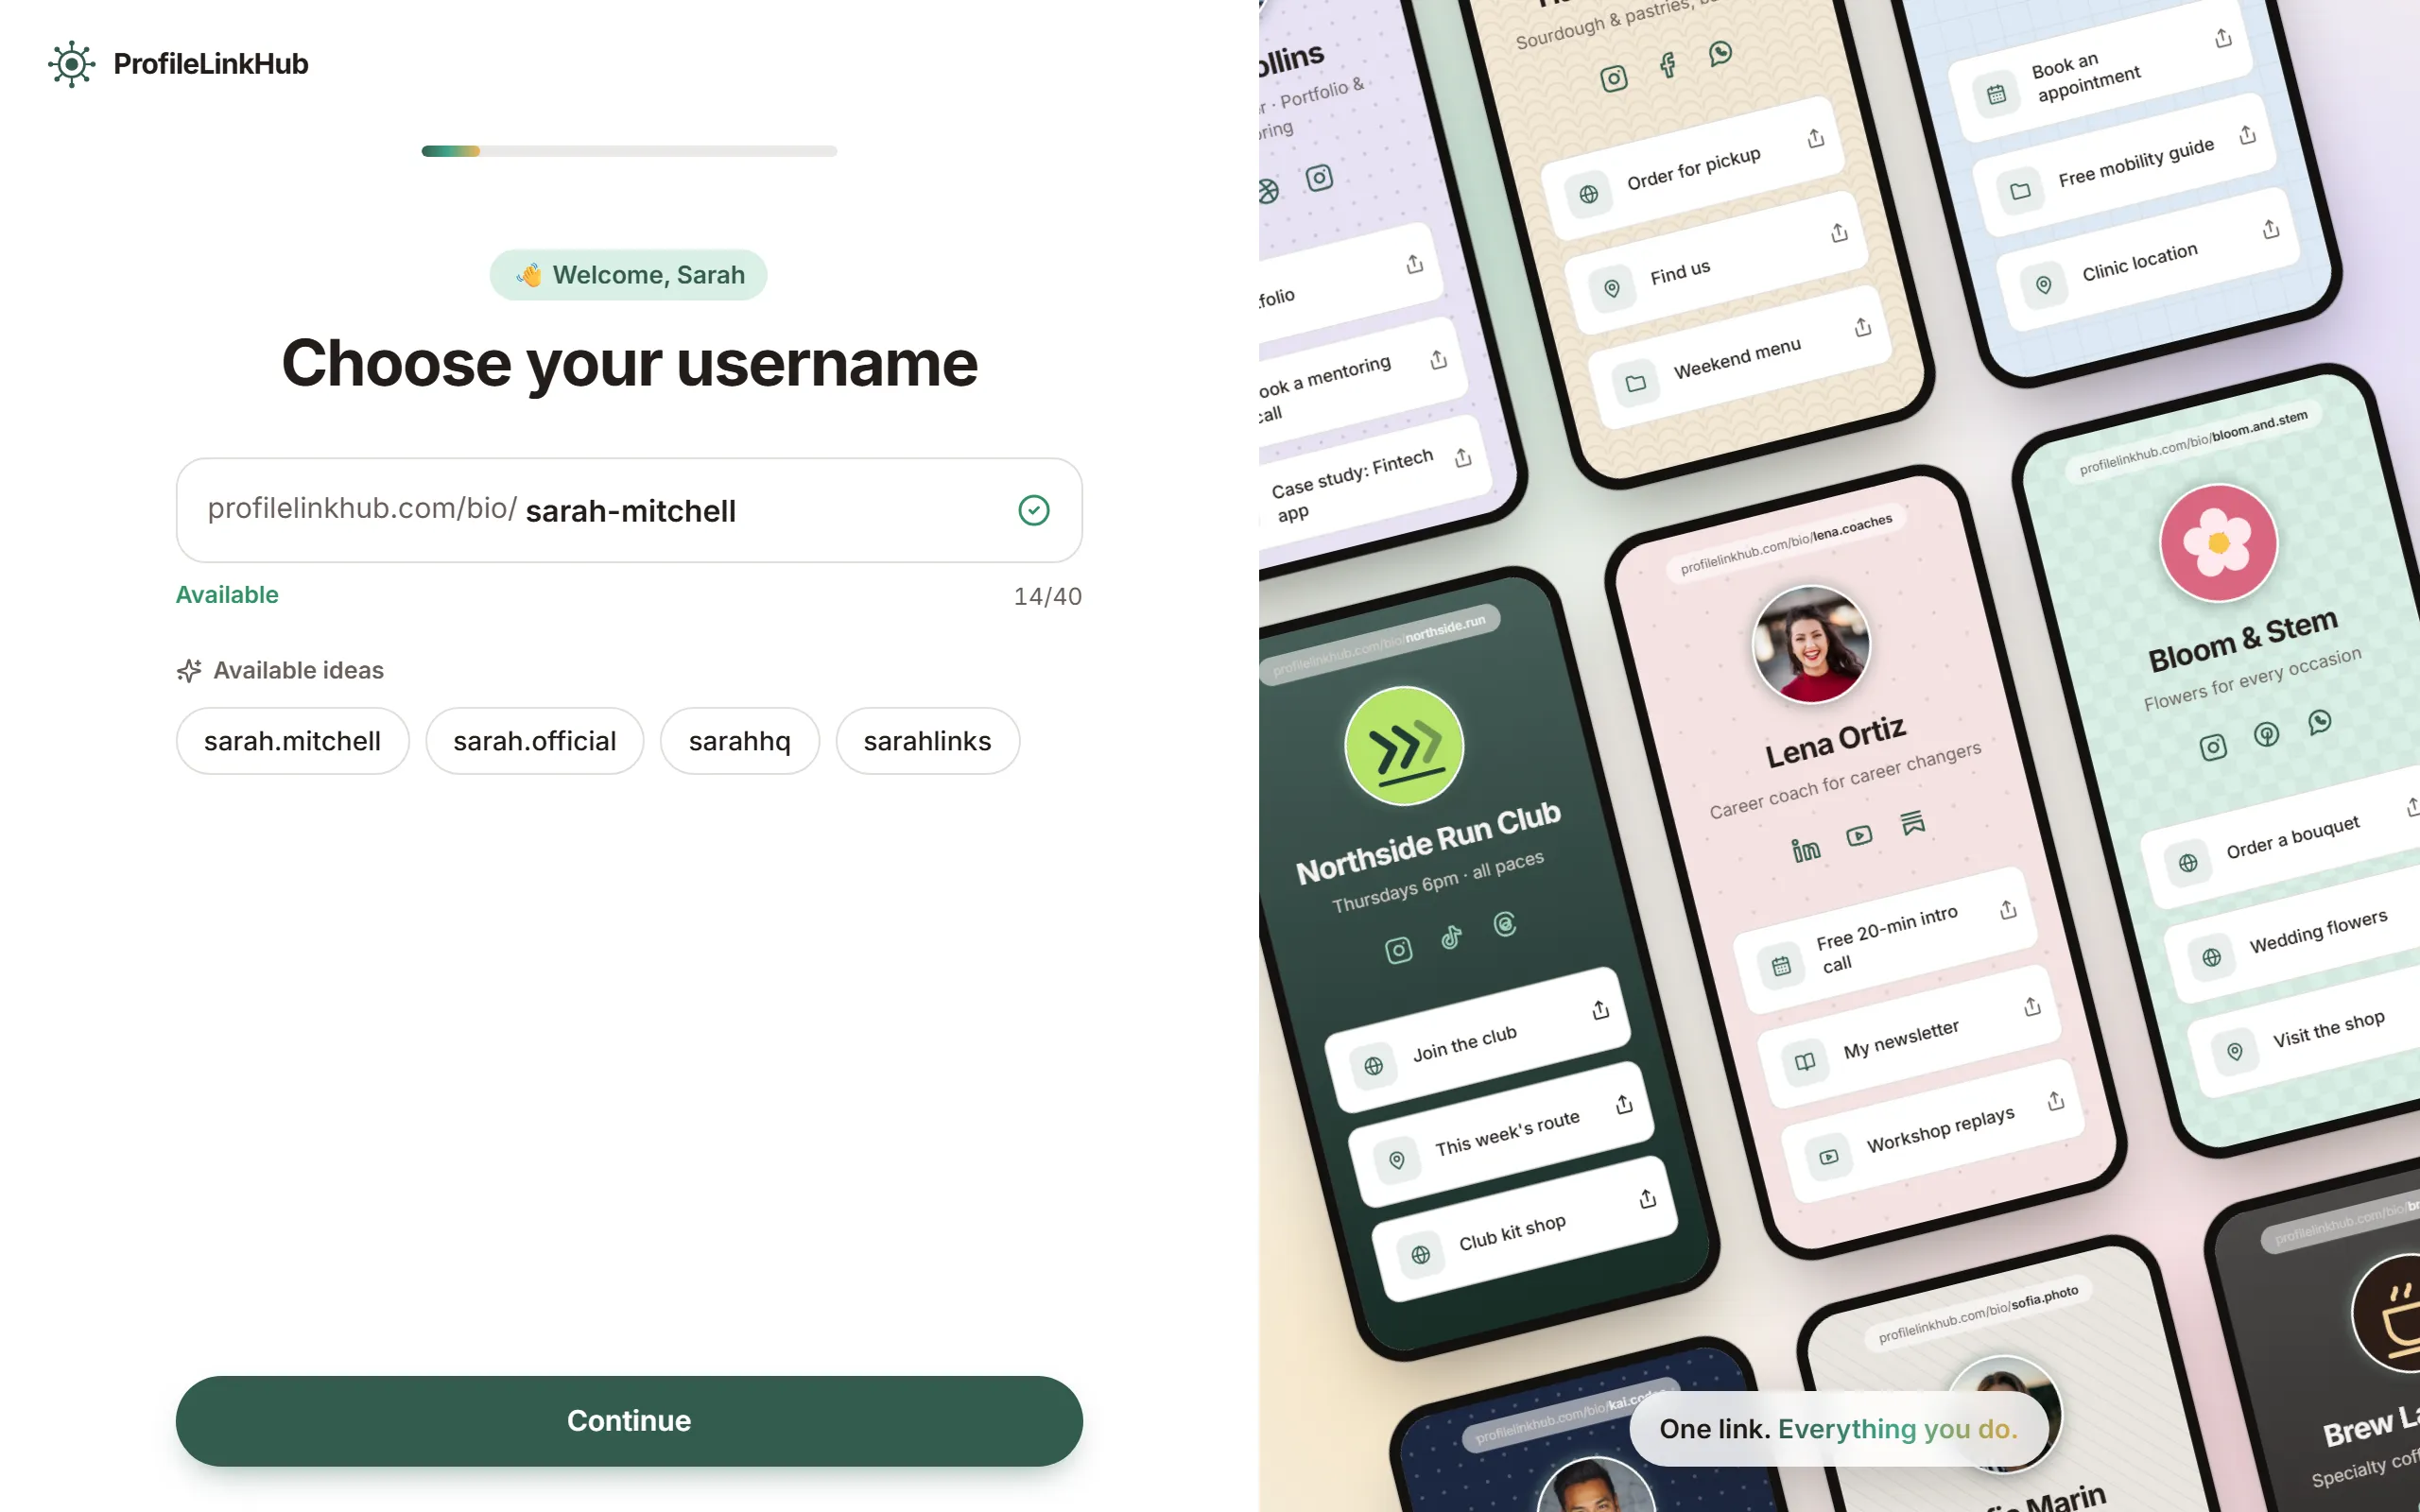
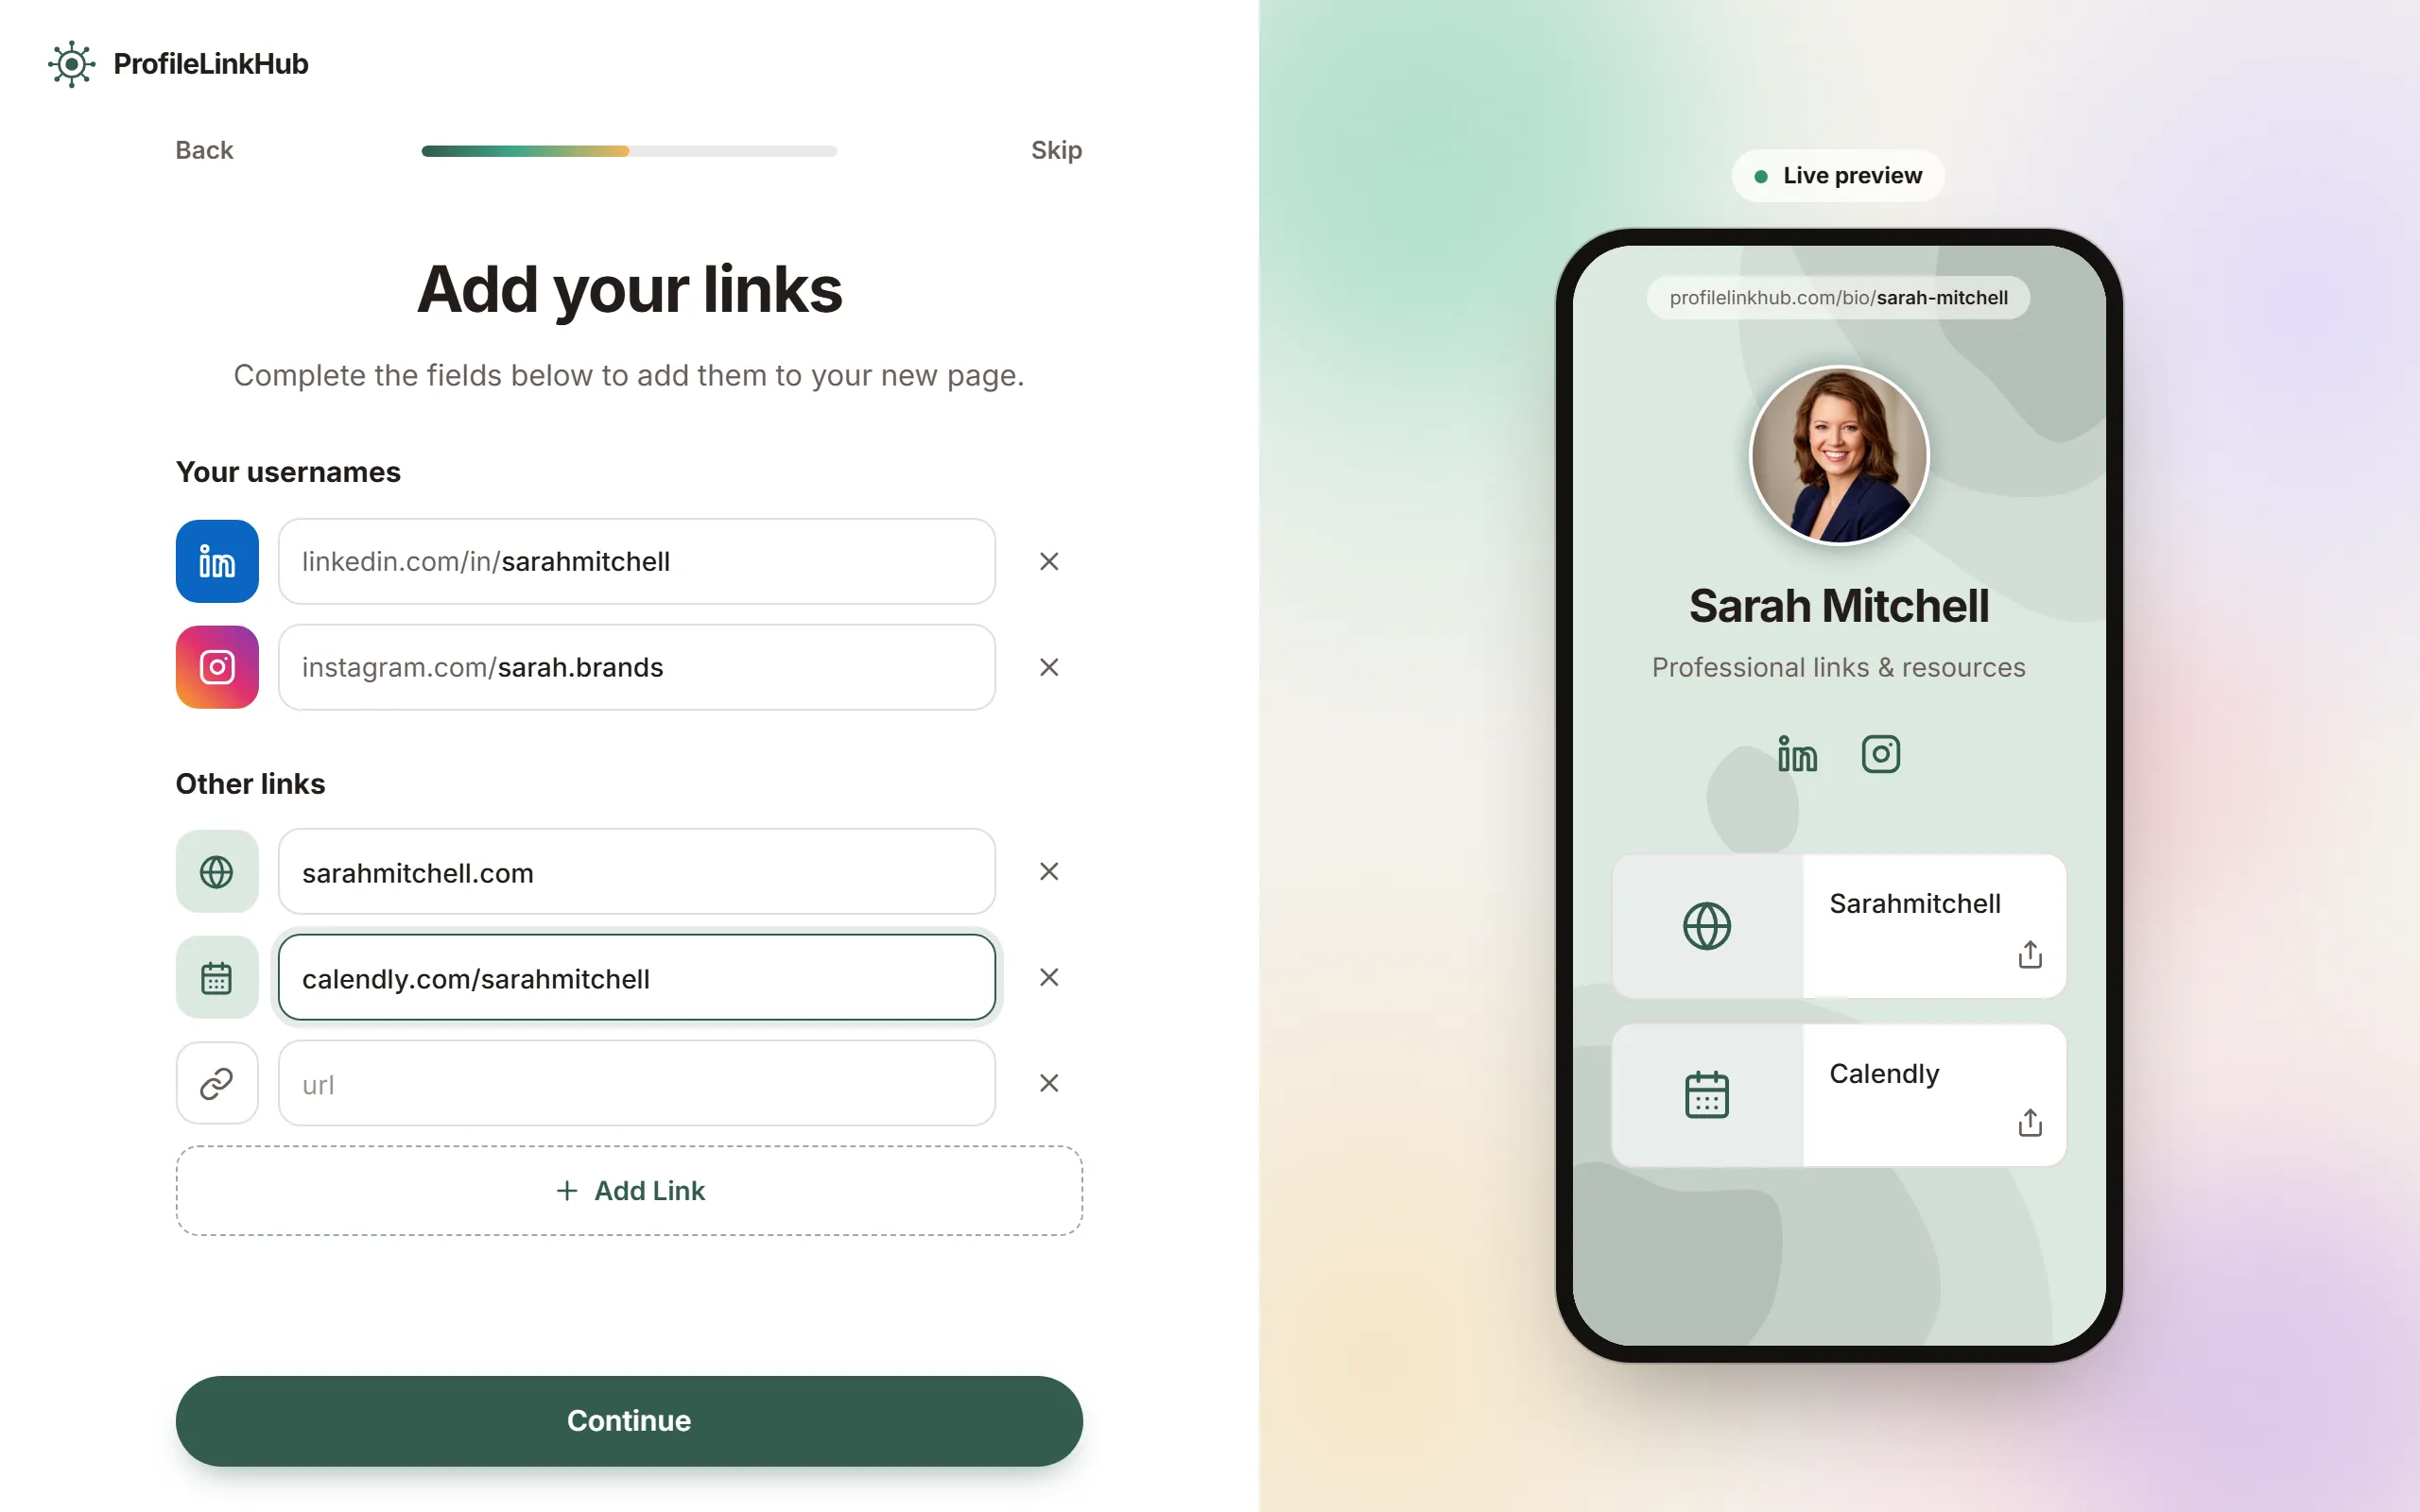
You can Skip any step except the username, and come back to it later on the Design tab. If you close the page part way, you'll continue where you left off next time you sign in.
Your dashboard
After the setup you land on the Design tab of your dashboard, which shows your page the way visitors see it. Next to Your page is live you can see your page's address. On a computer it's at the top of the screen; on a phone it's just above your page. The rest of this guide shows how to change each part of your page there.
On a computer, the Design tab has three parts. On the left, Add to your page lists what a page is made of: Photo, Header (your name and sub-header), Social icons, Link and Background, each with a check mark once it's done. Your page is in the middle. On the right is the form for whatever you've selected; on a new page it opens on your photo. On a smaller laptop screen the left side is a narrow column of icons.
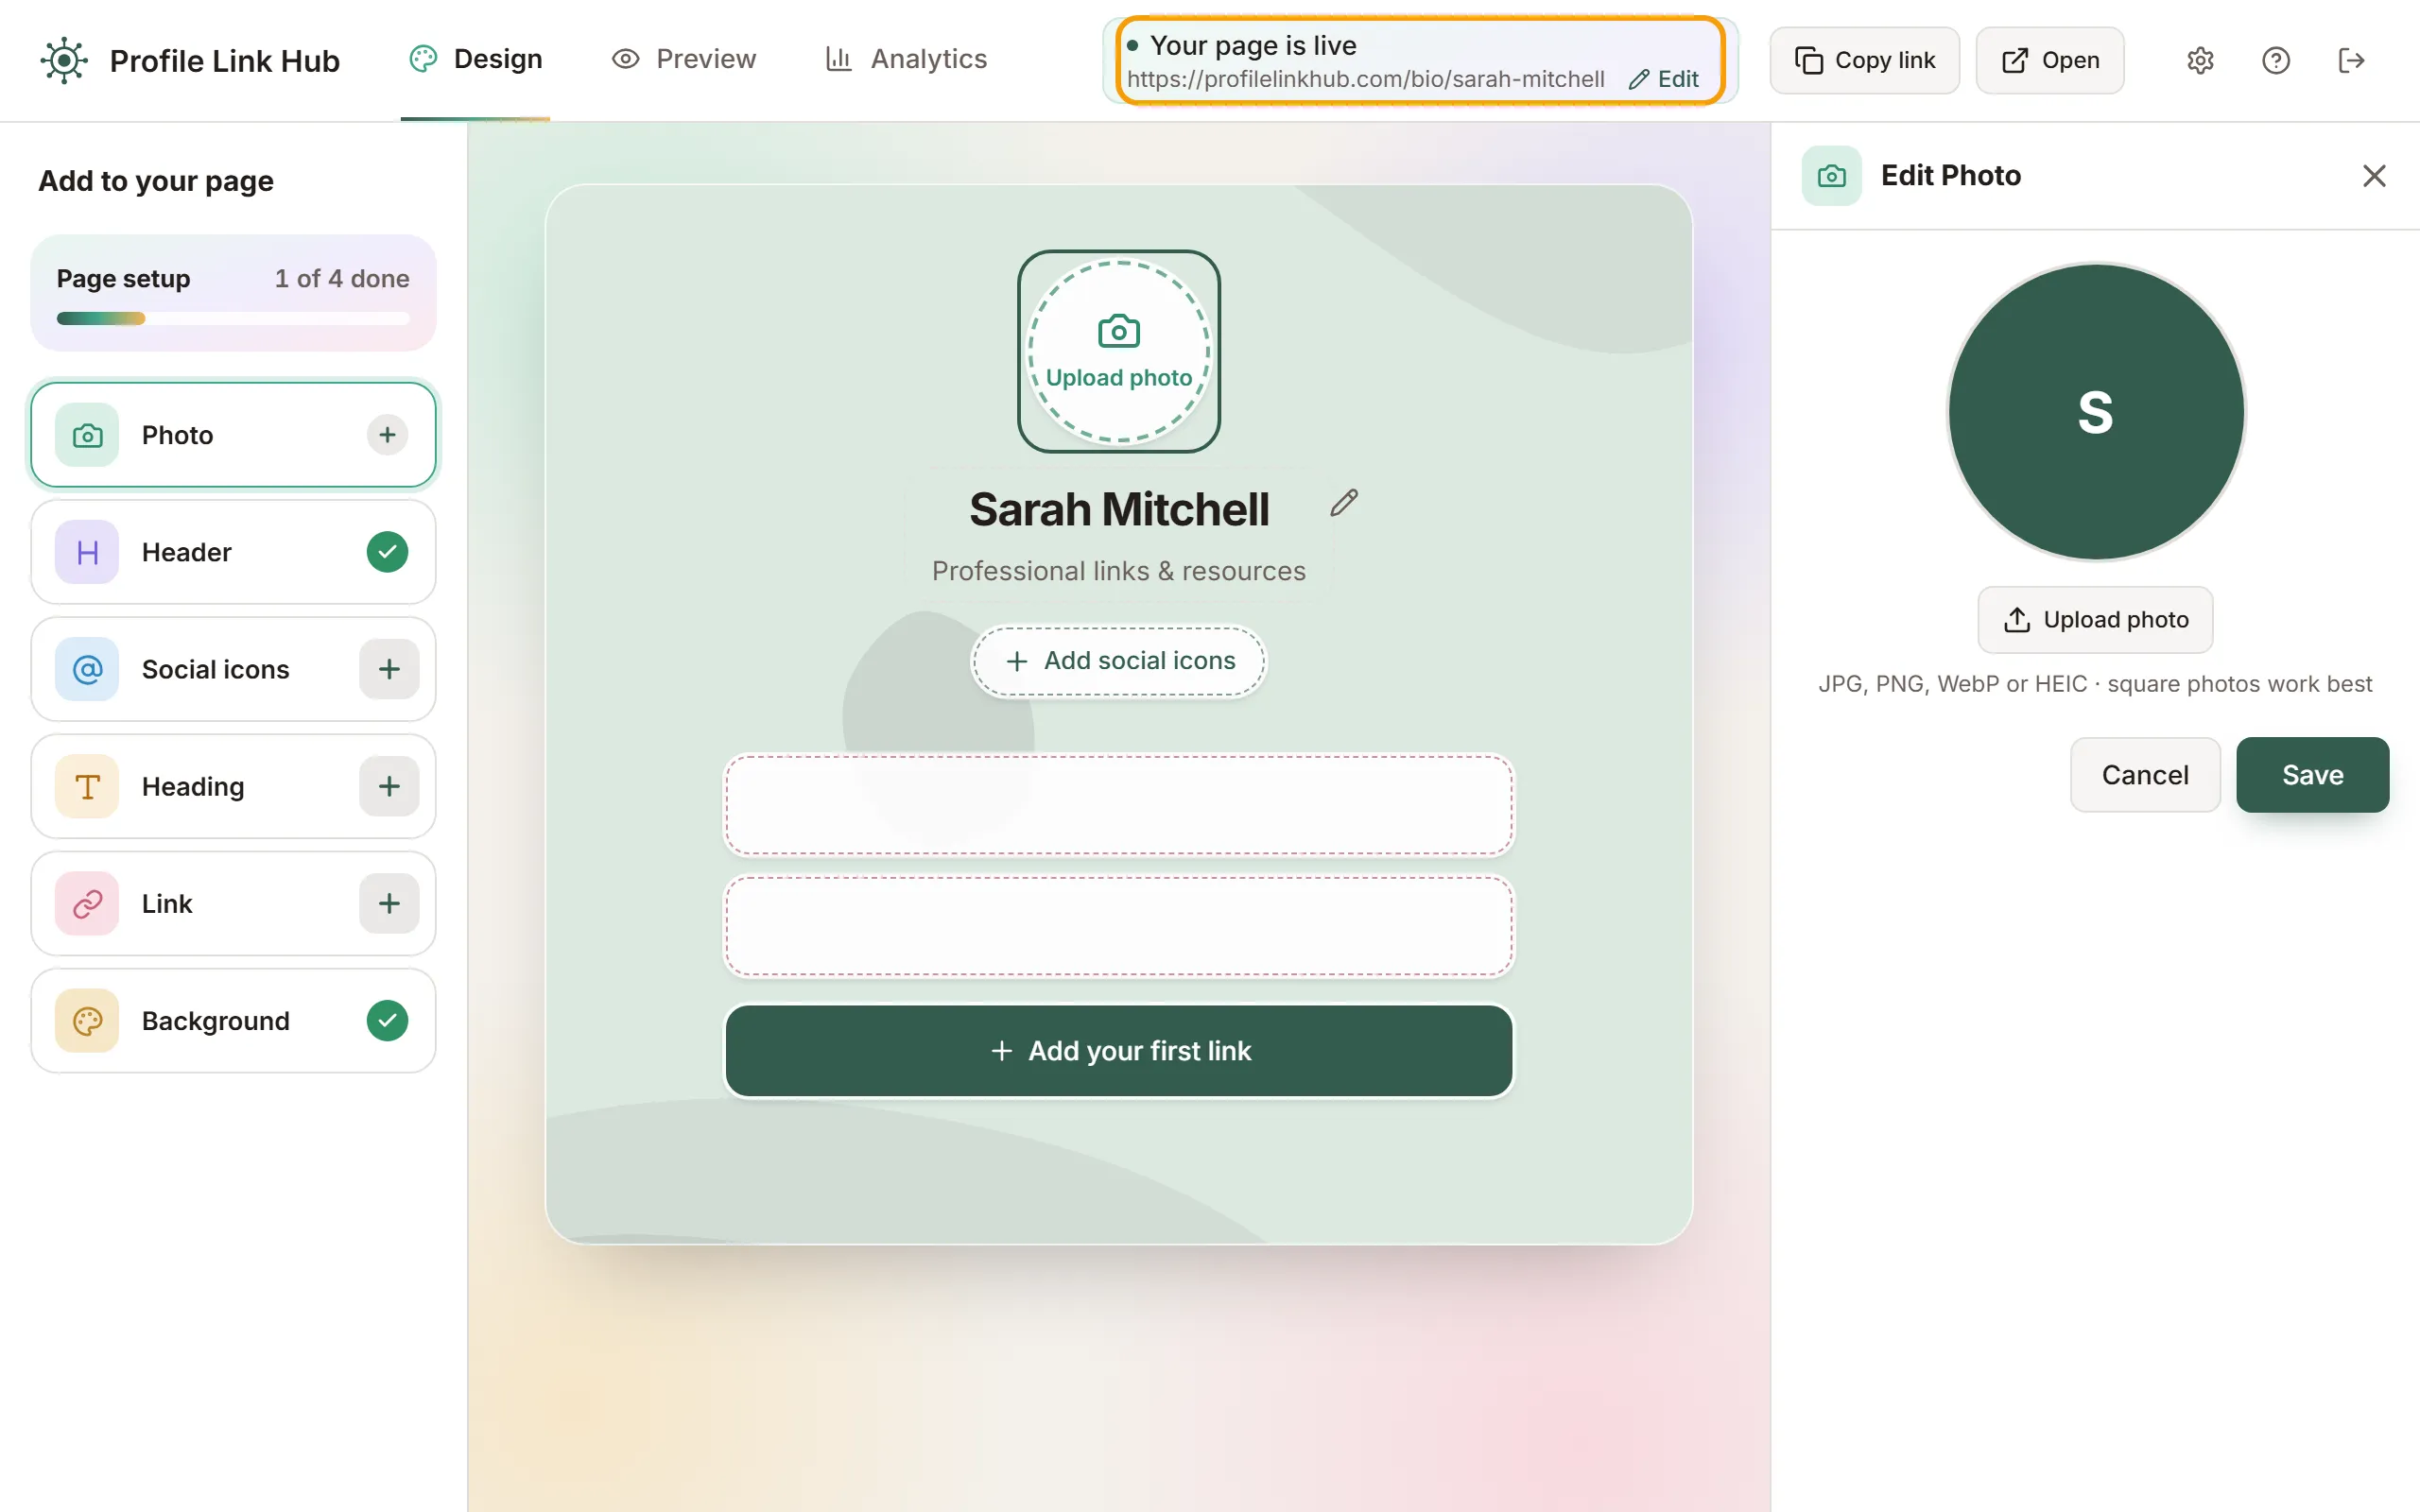
Your page is public from the start, even with no links: visitors see your name and "No links published yet."
2. Add your photo
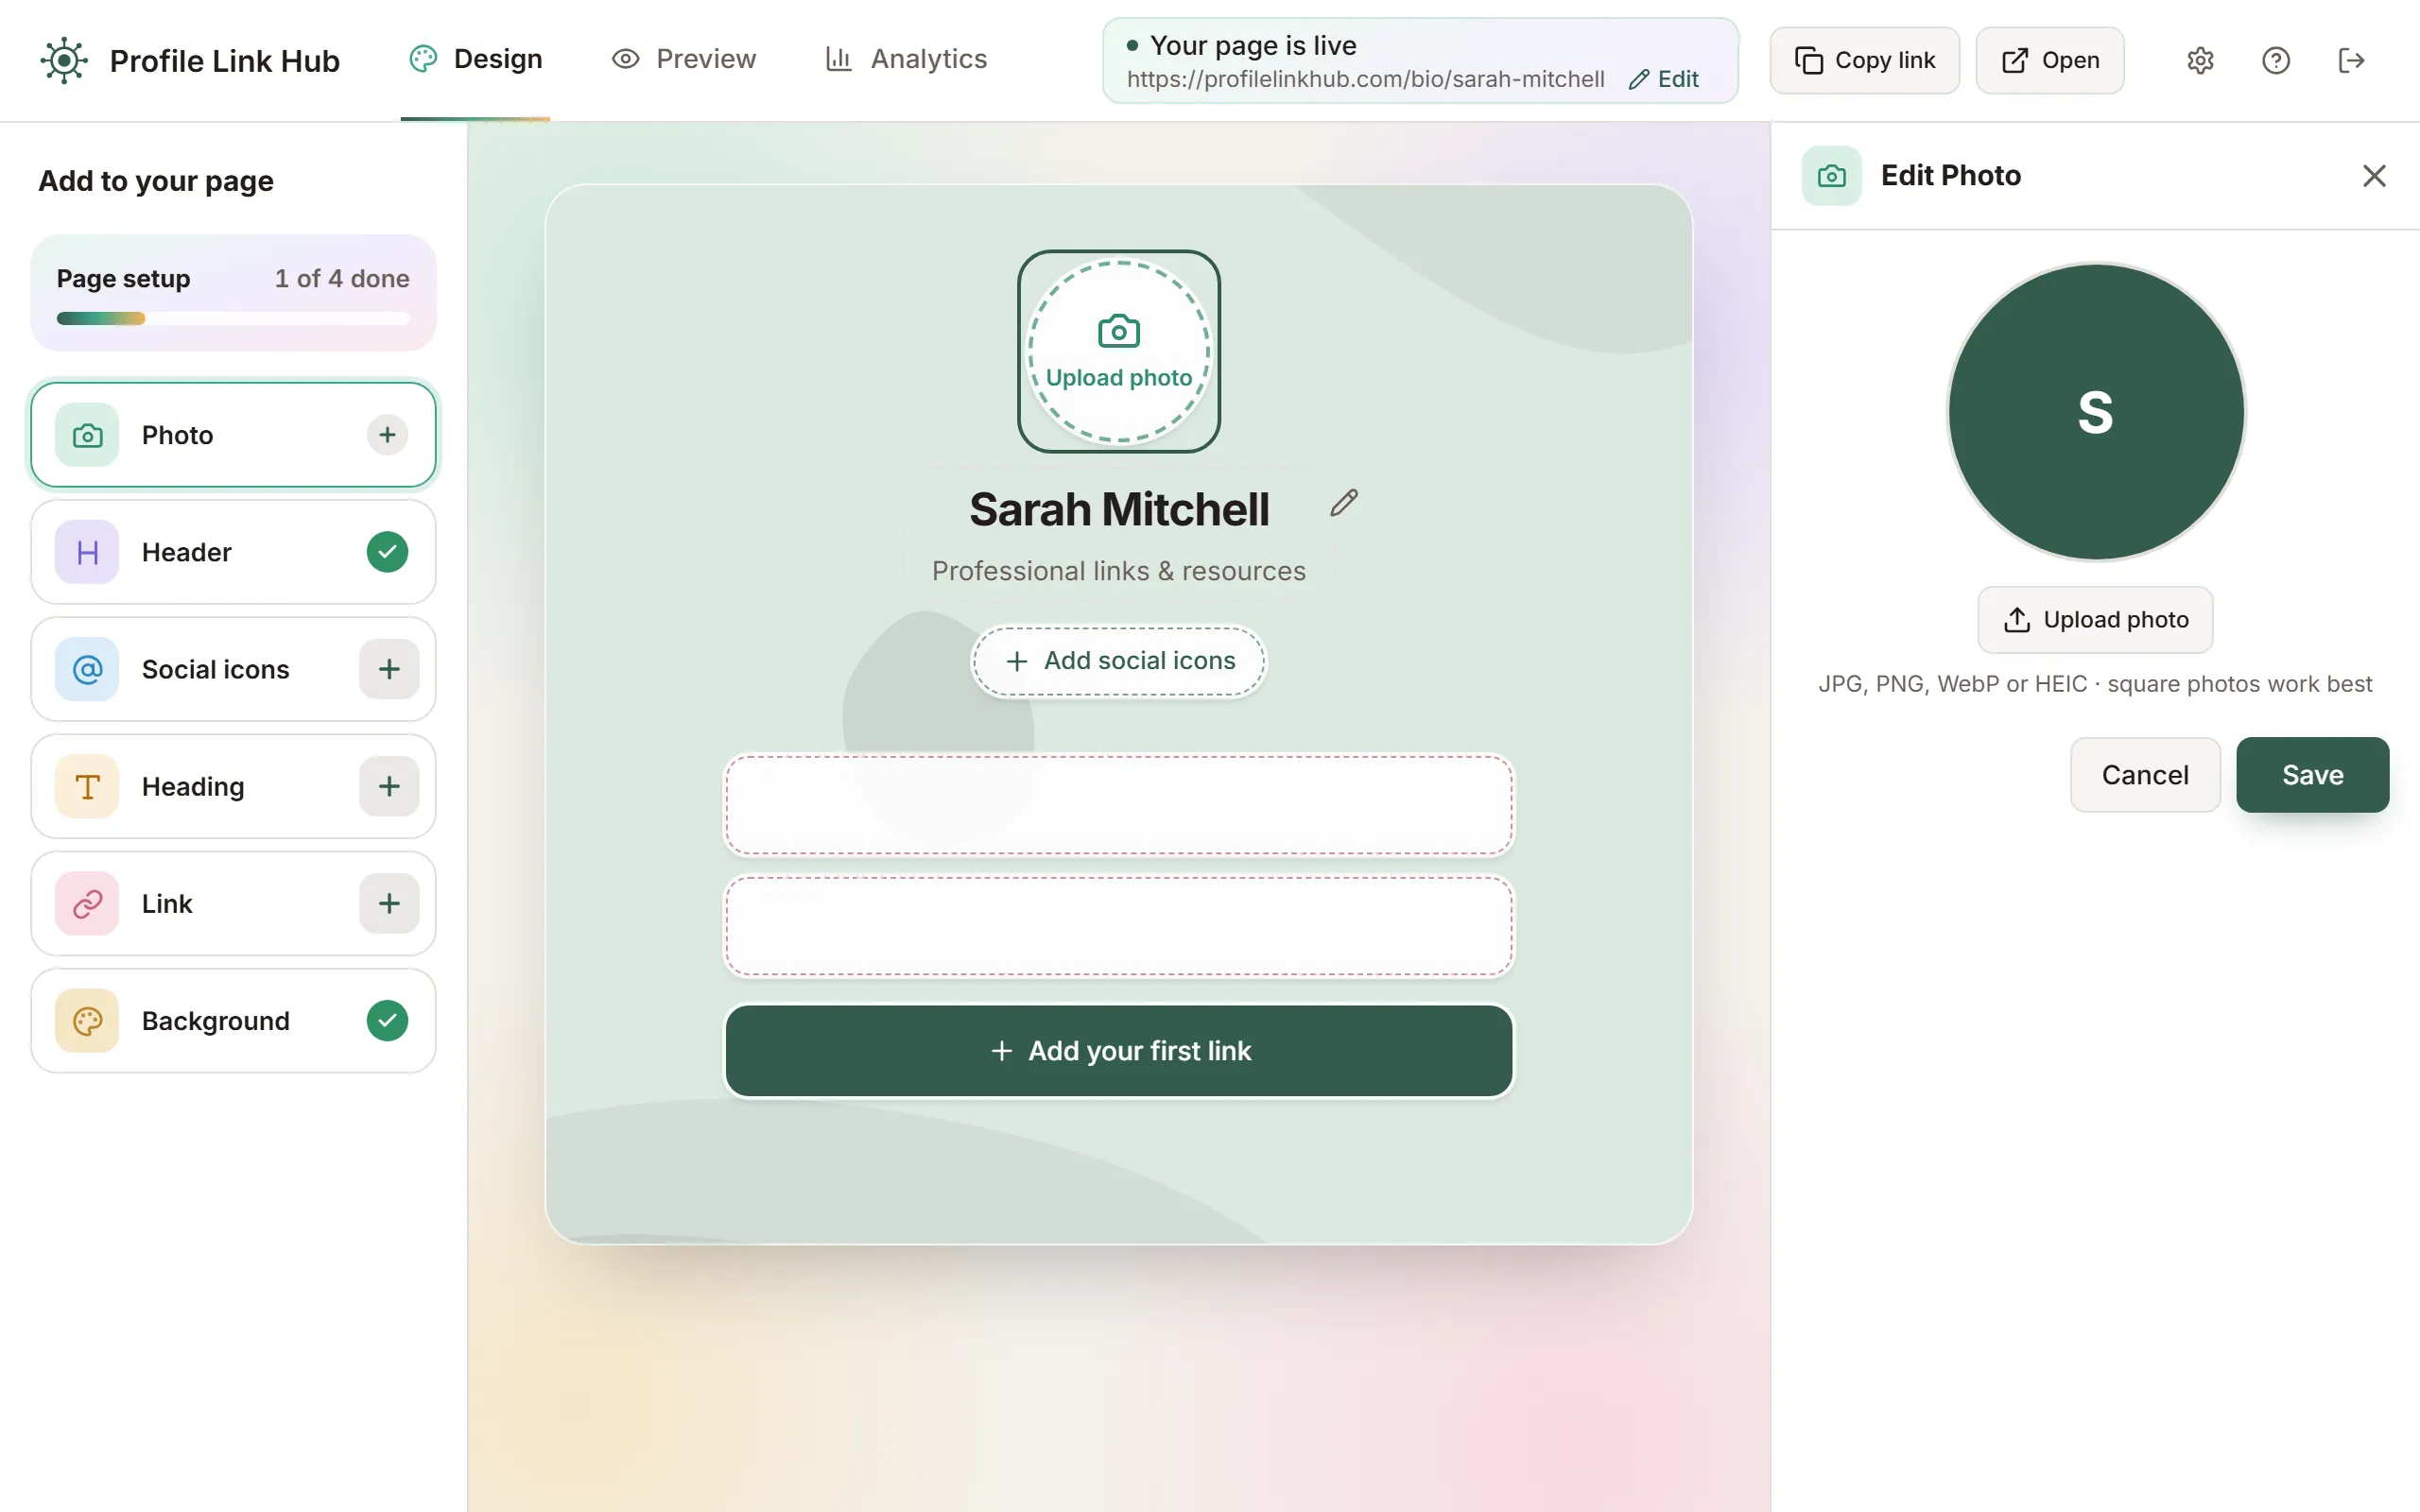
- Click your photo, or the empty circle (on a phone, the circle with your first initial) if you don't have one yet. On a computer you can also click Photo on the left. The Edit Photo panel opens.
- Click Upload photo and choose a JPG, PNG, WebP or HEIC file. Square photos work best.
- Drag the photo to move it inside the circle, and use the zoom buttons if you need to.
- Click Save.
3. Add your name and a sub-header
- Click your name on the page, or Header on the left on a computer. The Edit Profile panel opens.
- Type your name in Display Name.
- In Sub-header, write one short line about what you do, for example your job title or the service you offer. It shows under your name. Until you change it, the sub-header reads "Professional links & resources". To show nothing there, clear the field with the X button.
- Click Save.
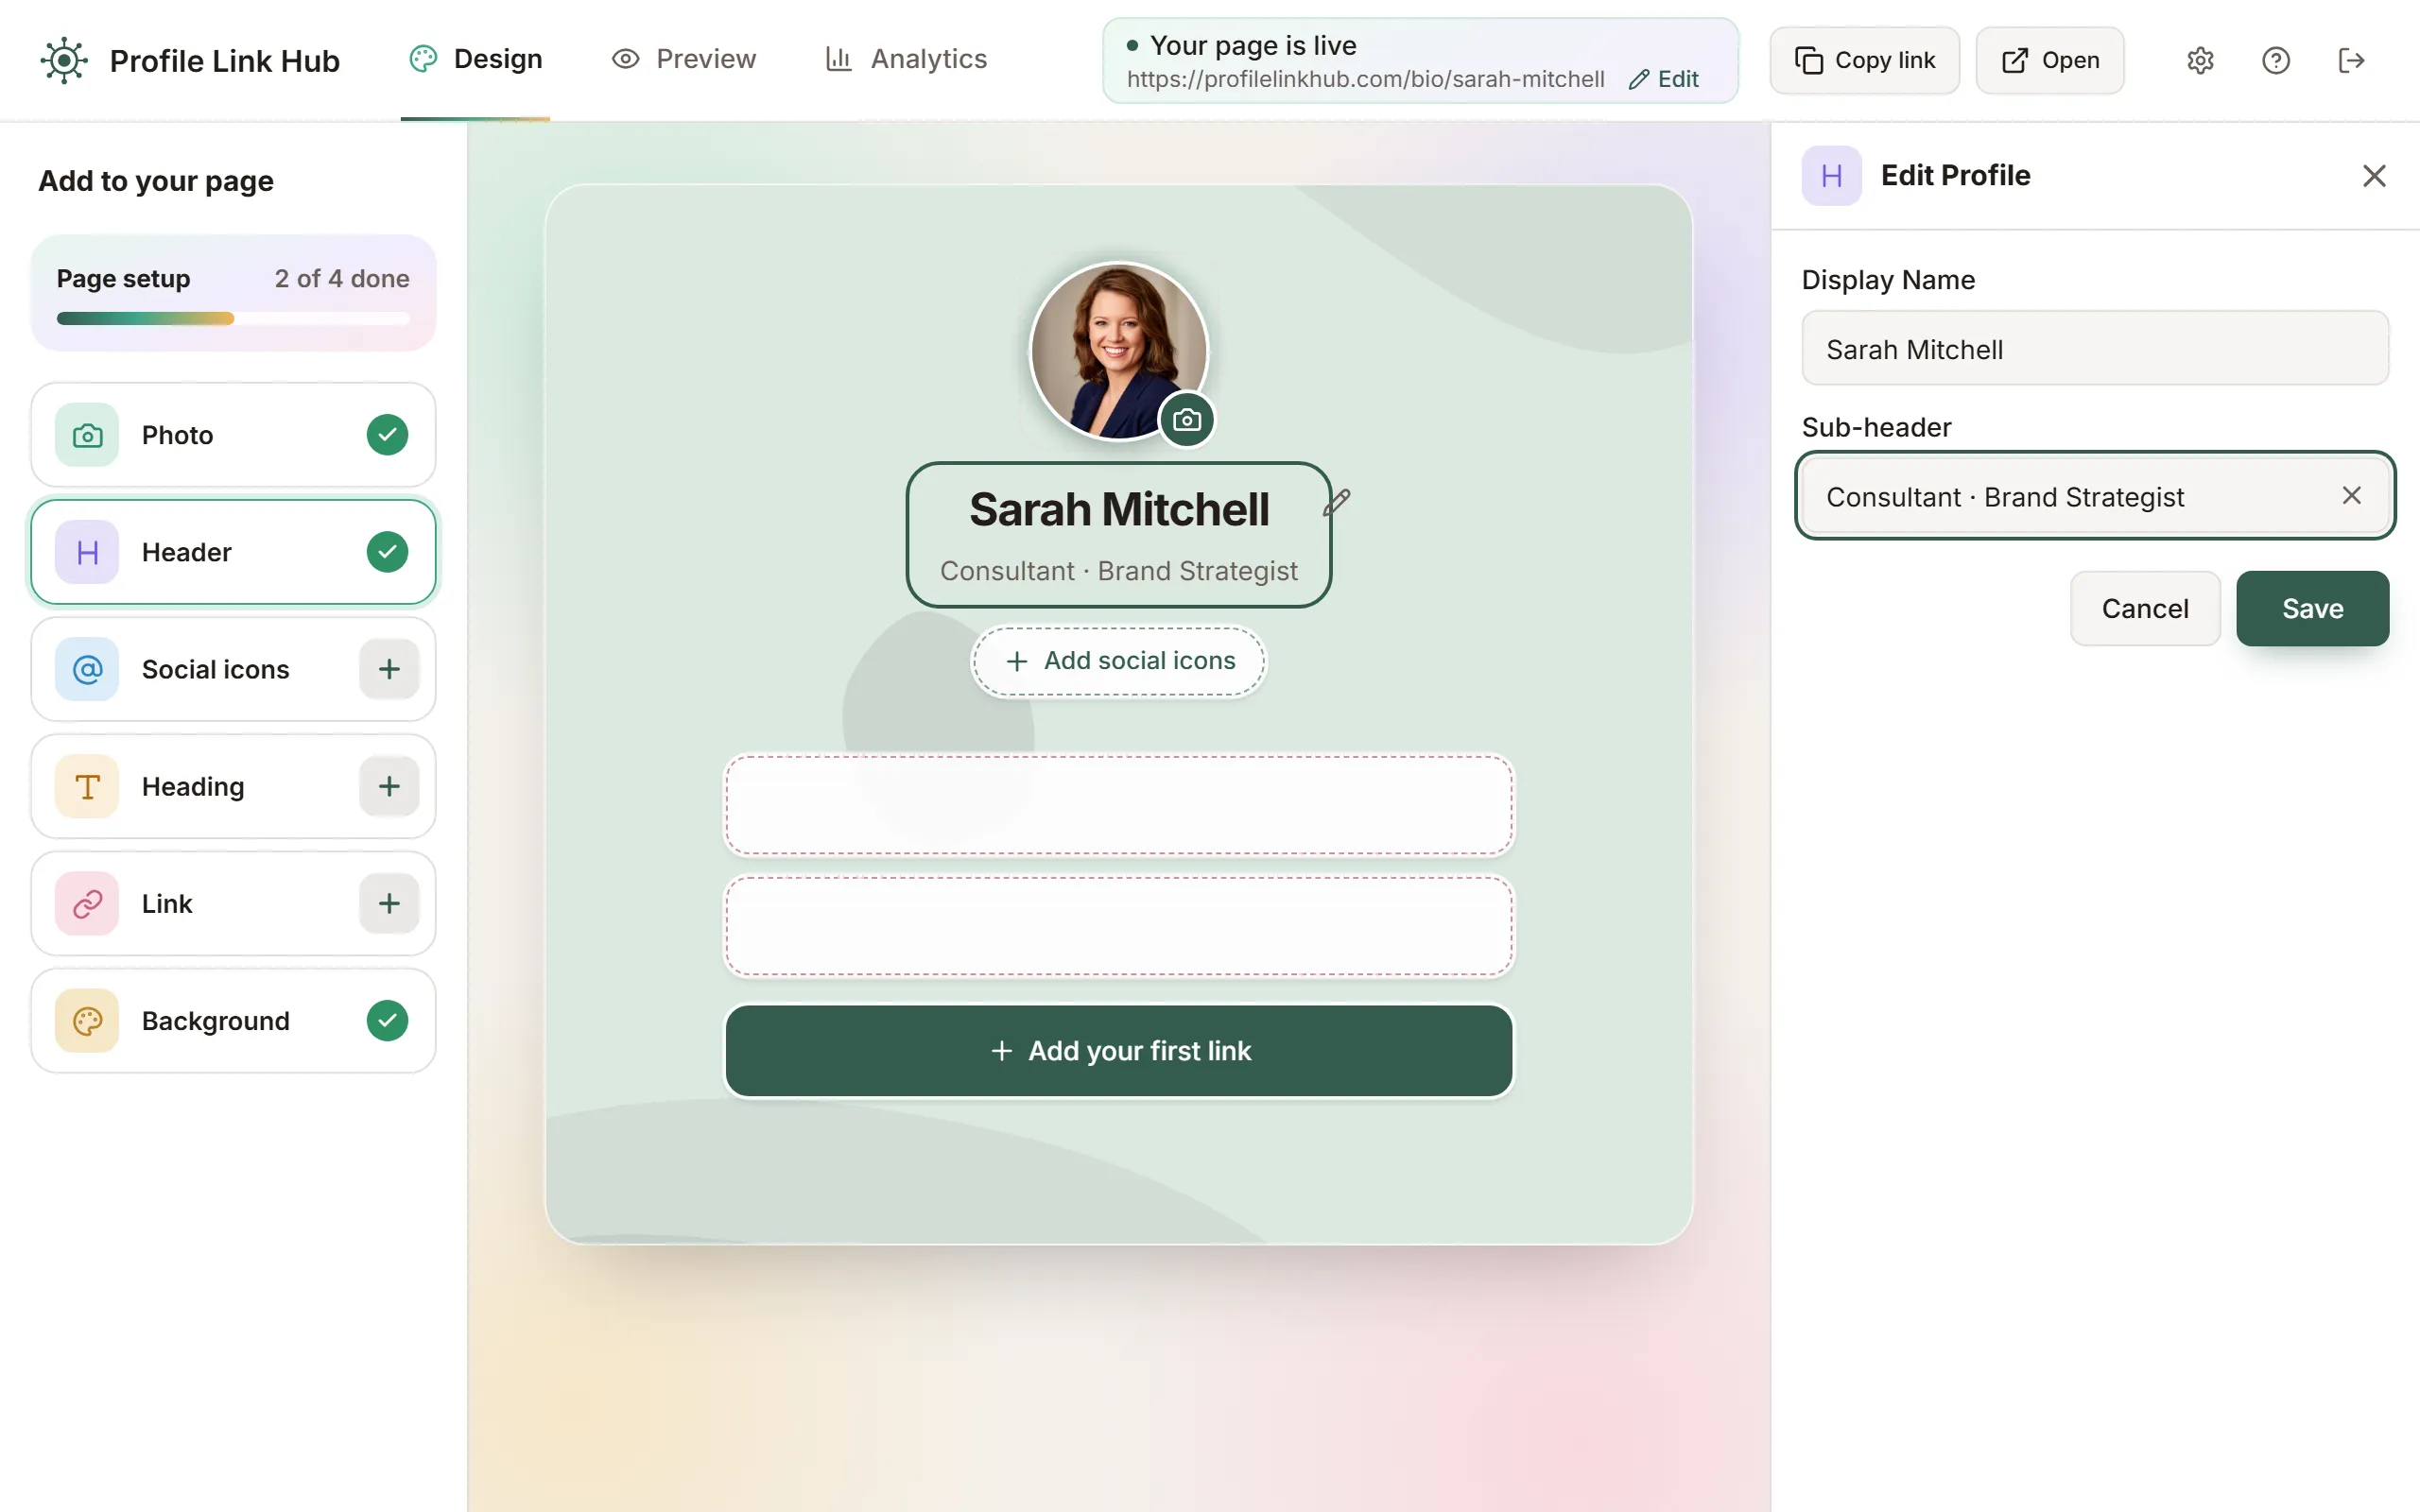
The page updates as you type, so you can see how it looks before you save.
4. Add your first link
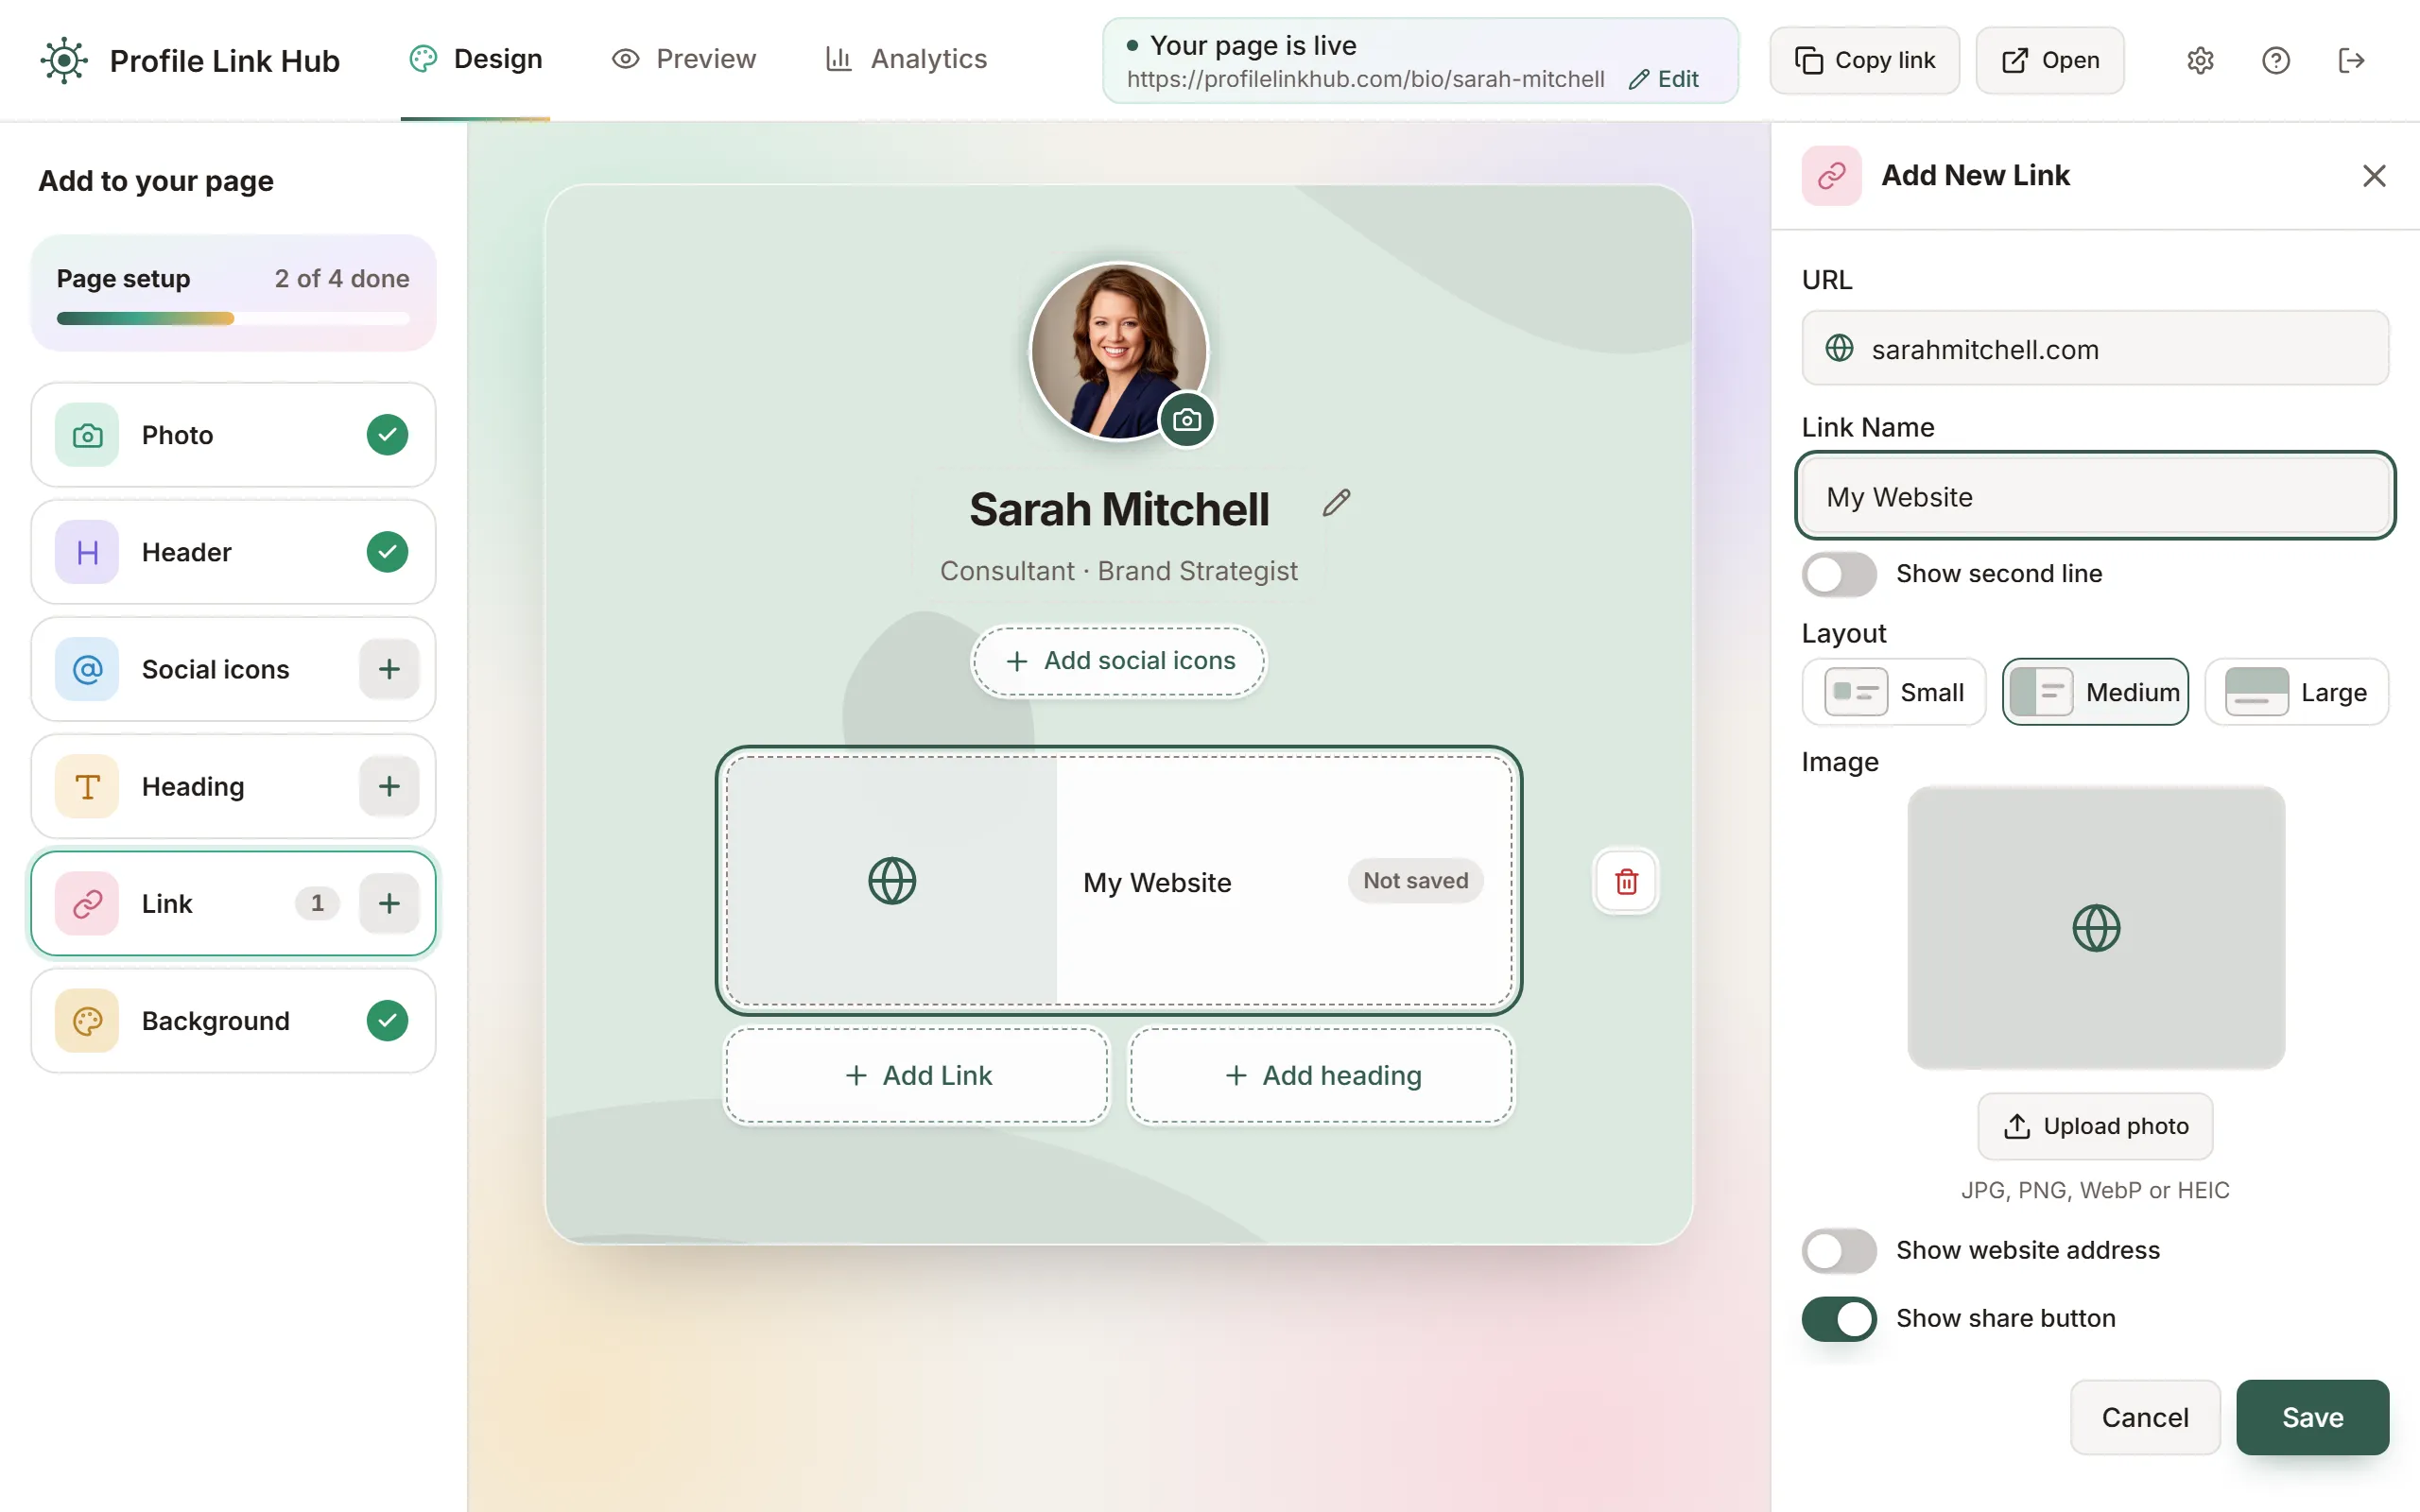
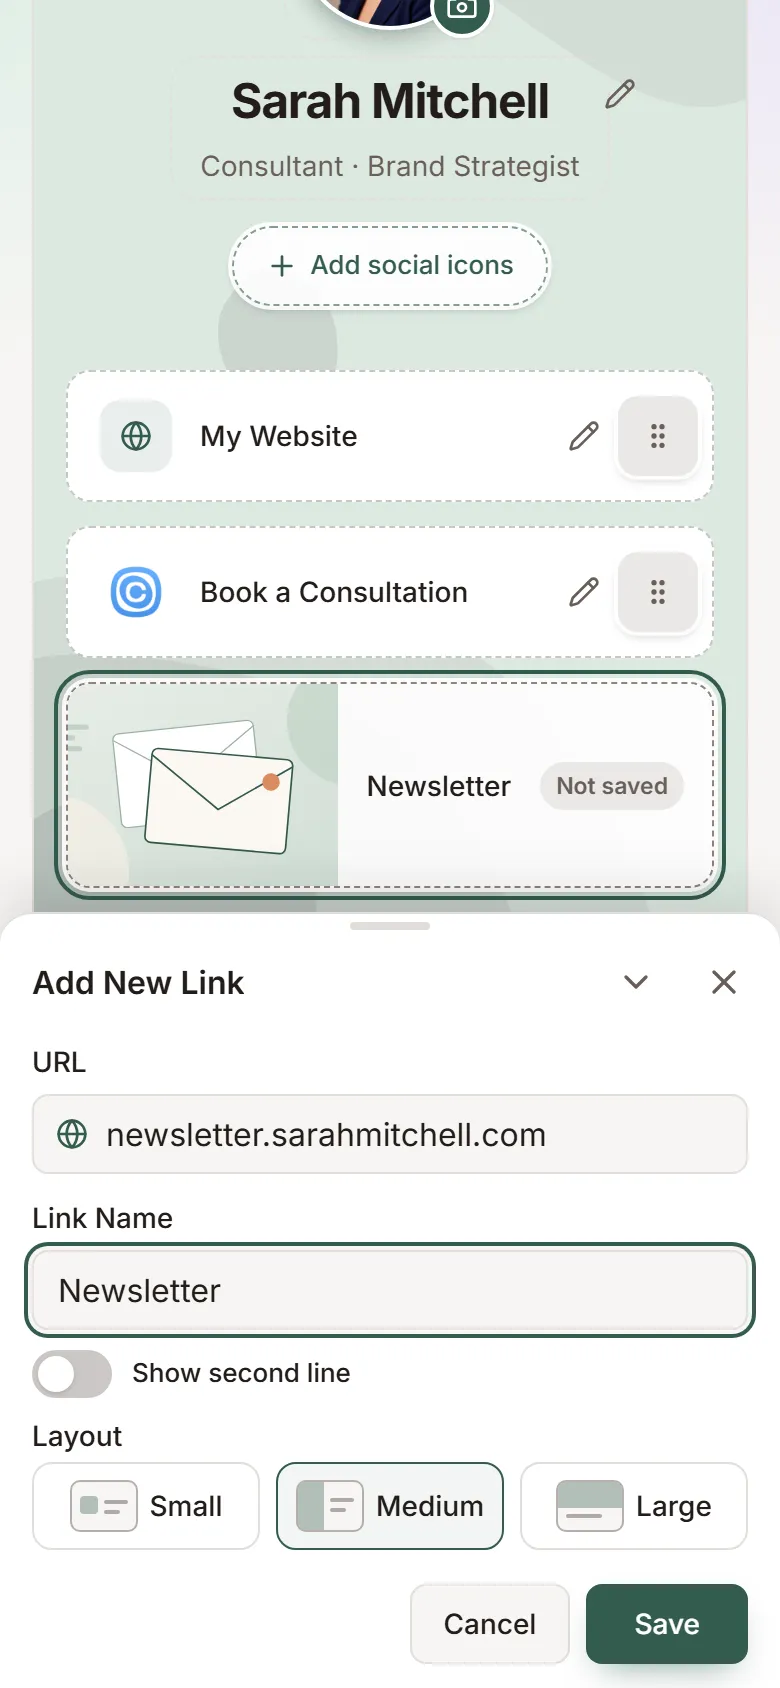
- Click Add your first link, or the + next to Link on the left on a computer. The Add New Link panel opens, and a new link marked Not saved appears on your page.
- In URL, paste or type the web address. You can leave out "https://", it's added for you.
- Link Name fills in from the page you linked: its title, or the site's name if the page has none (for example "Calendly" for calendly.com). Type over it to use the text you want visitors to see on the button, for example "Book a Consultation". If the page has a short description, Show second line turns on with it; change or remove it, or turn on Show second line yourself to add a short line under the name, for example "Free 30-minute intro call" (up to 80 characters). Long names and second lines wrap onto more lines; nothing is cut off.
- Under Layout, new links start as Medium, with the picture the linked page shows on the left (see "Make a link bigger with a picture" below). Choose Small for a compact link with an icon, or Large for a picture across the top.
- With Small, under Icon, Automatic shows the website's own icon, the small logo you see on its browser tab. If the site doesn't have one, it picks an icon from the address (a calendar, a map, a globe and so on). To use your own image instead, like a book cover or a logo, choose Upload image and click Upload your own (a square PNG, JPG or WebP under 200 KB, shown in full colour). For text only, choose None.
- Click Save.
Each link has a share button at its end so visitors can pass it on. To remove it from one link, turn off Show share button in that link's form.
5. Add more links and put them in order
Click Add Link under your links to add another one. On a computer, each click on Add Link or on the + next to Link adds one more empty link, so you can lay out several before you fill them in. Each one has its own Save, and what you type stays in it while you click something else. Links you haven't saved aren't on your live page.
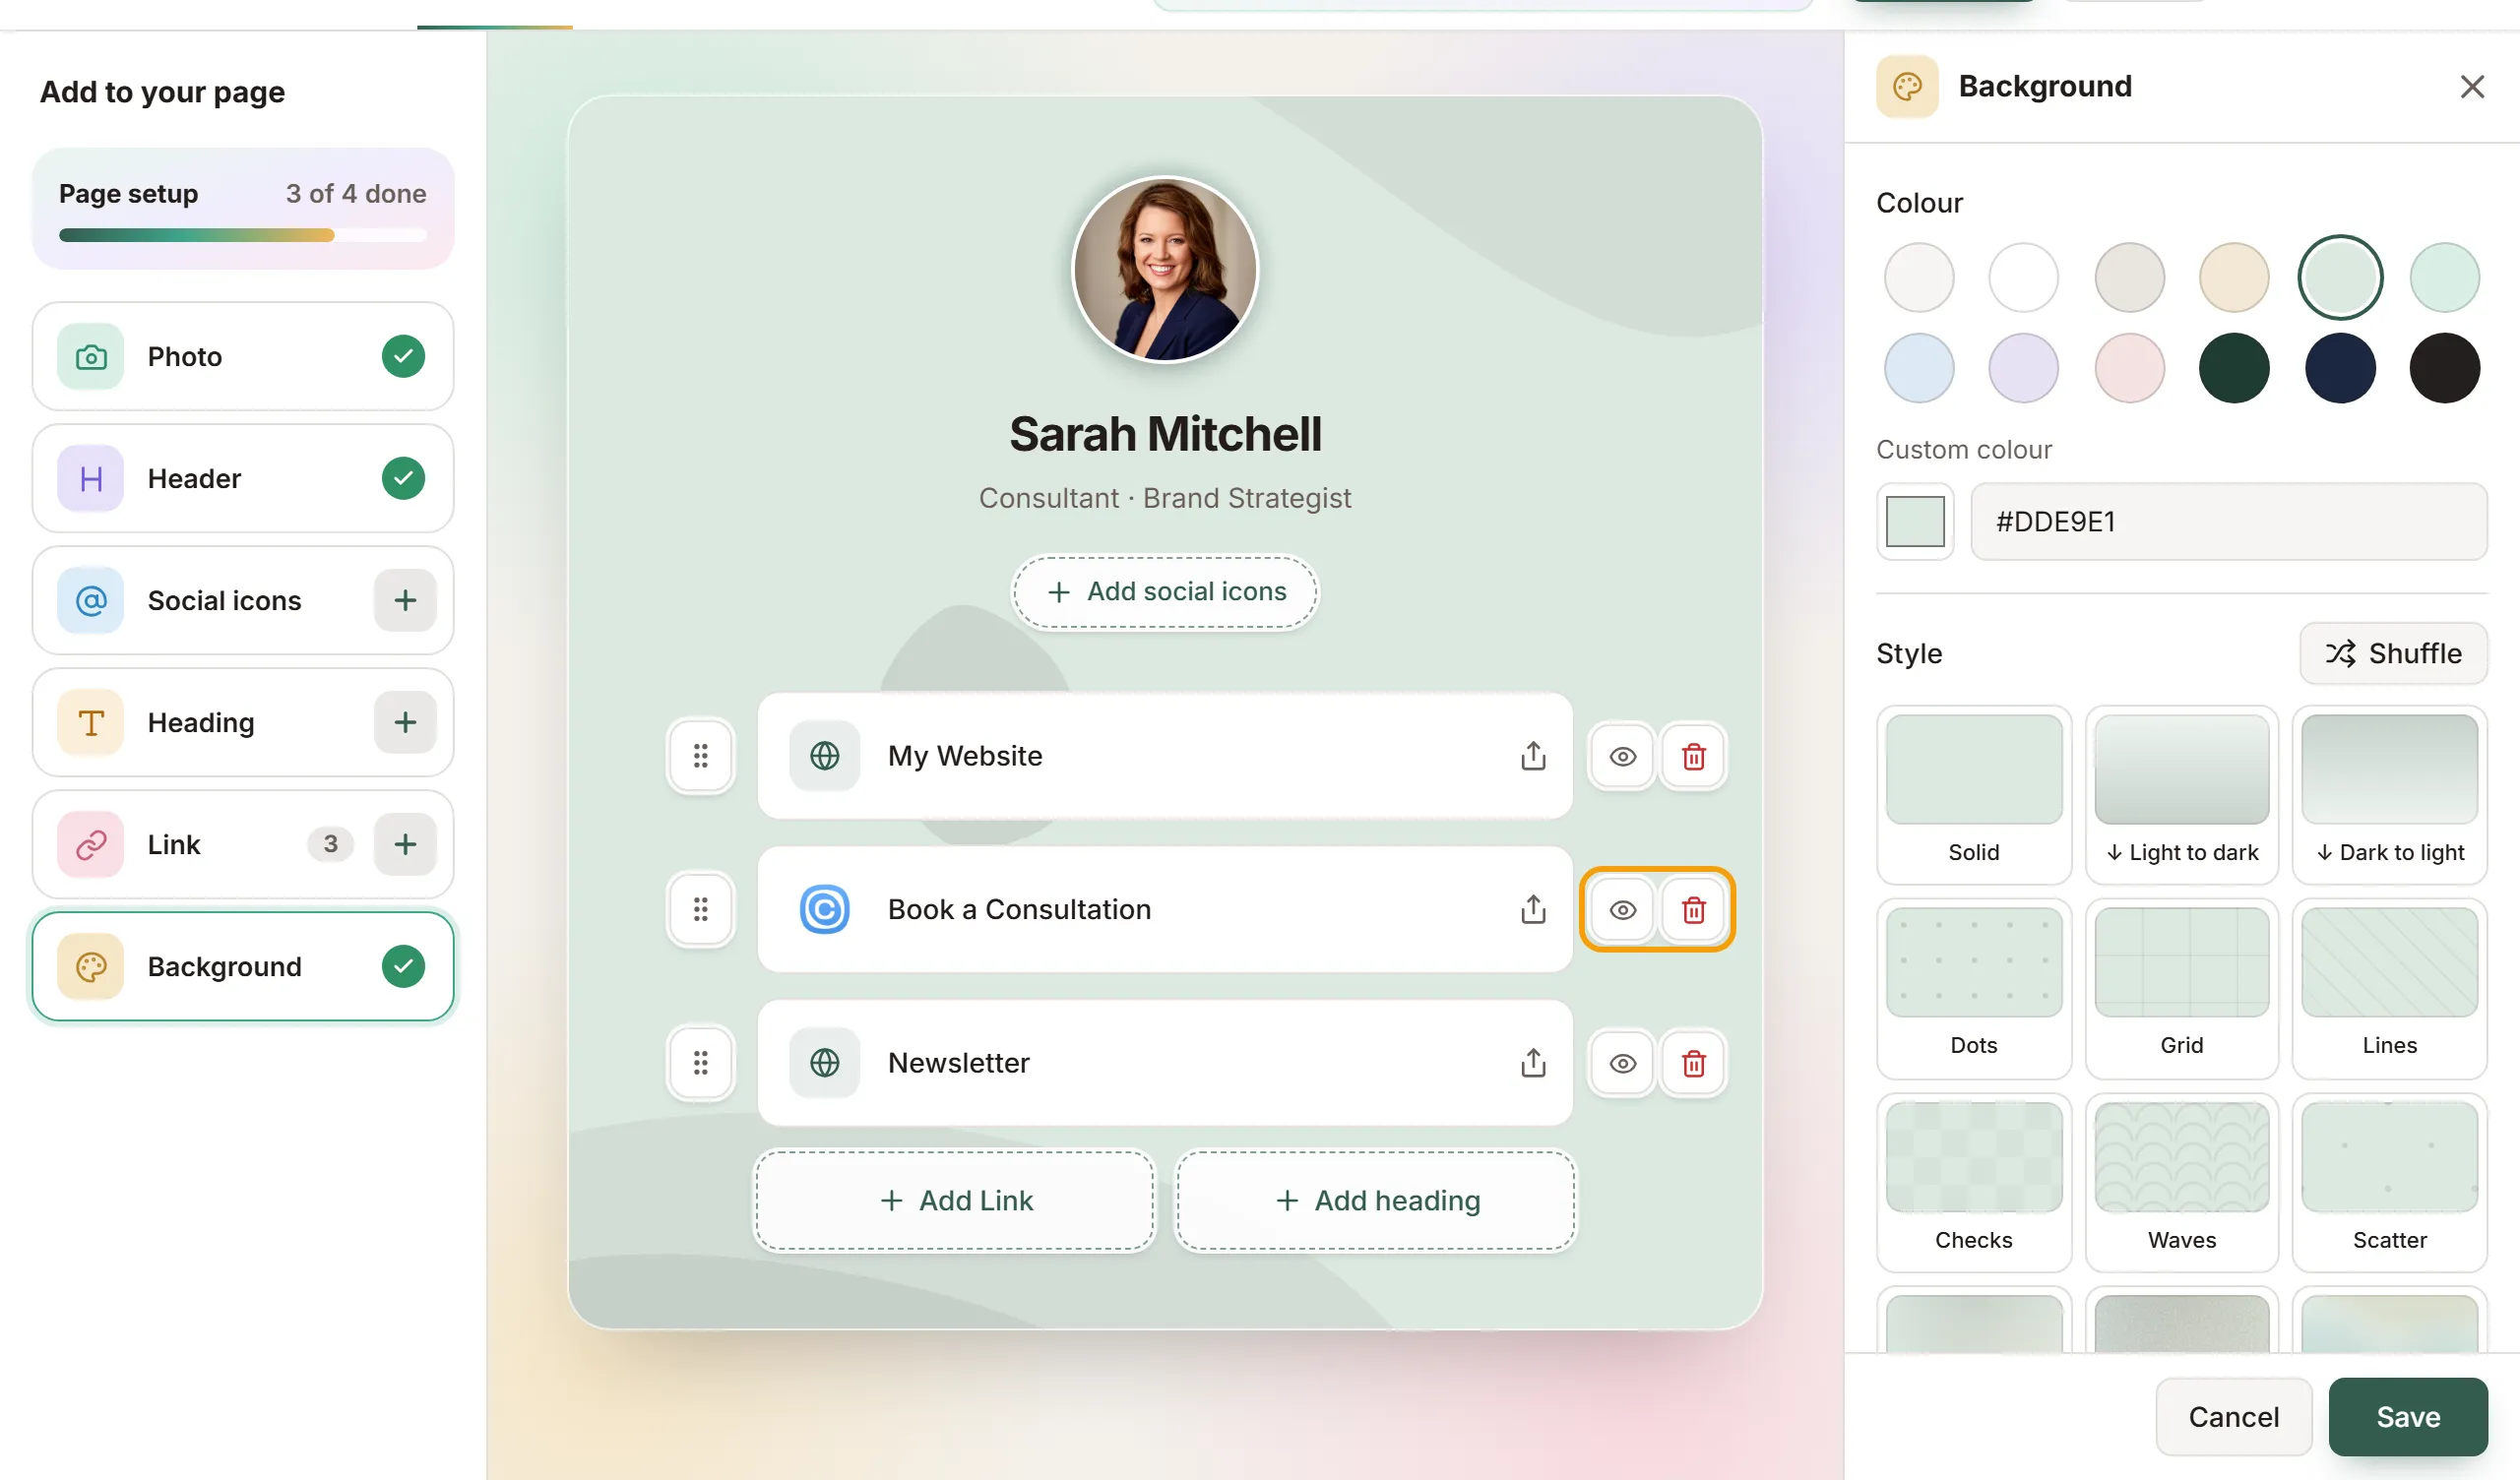
To change the order, drag a link by its handle (the six dots). On a computer the handle is to the left of each link; on a phone it's on the right.
To change a link, click it. The Edit Link panel opens with your link's name, second line, URL, layout and icon.
To take a link off your page for a while without losing it, hide it. On a computer, click the eye to the right of the link; click the bin next to it to delete the link. A hidden link stays on your Design tab, faded and marked Hidden, but visitors don't see it. Click the eye again to show it. On a phone, tap the link: Show on page and Delete are below Save.
On a phone, every editor opens as a sheet at the bottom of the screen instead of a side panel. Tap the photo, your name or a link to edit it.
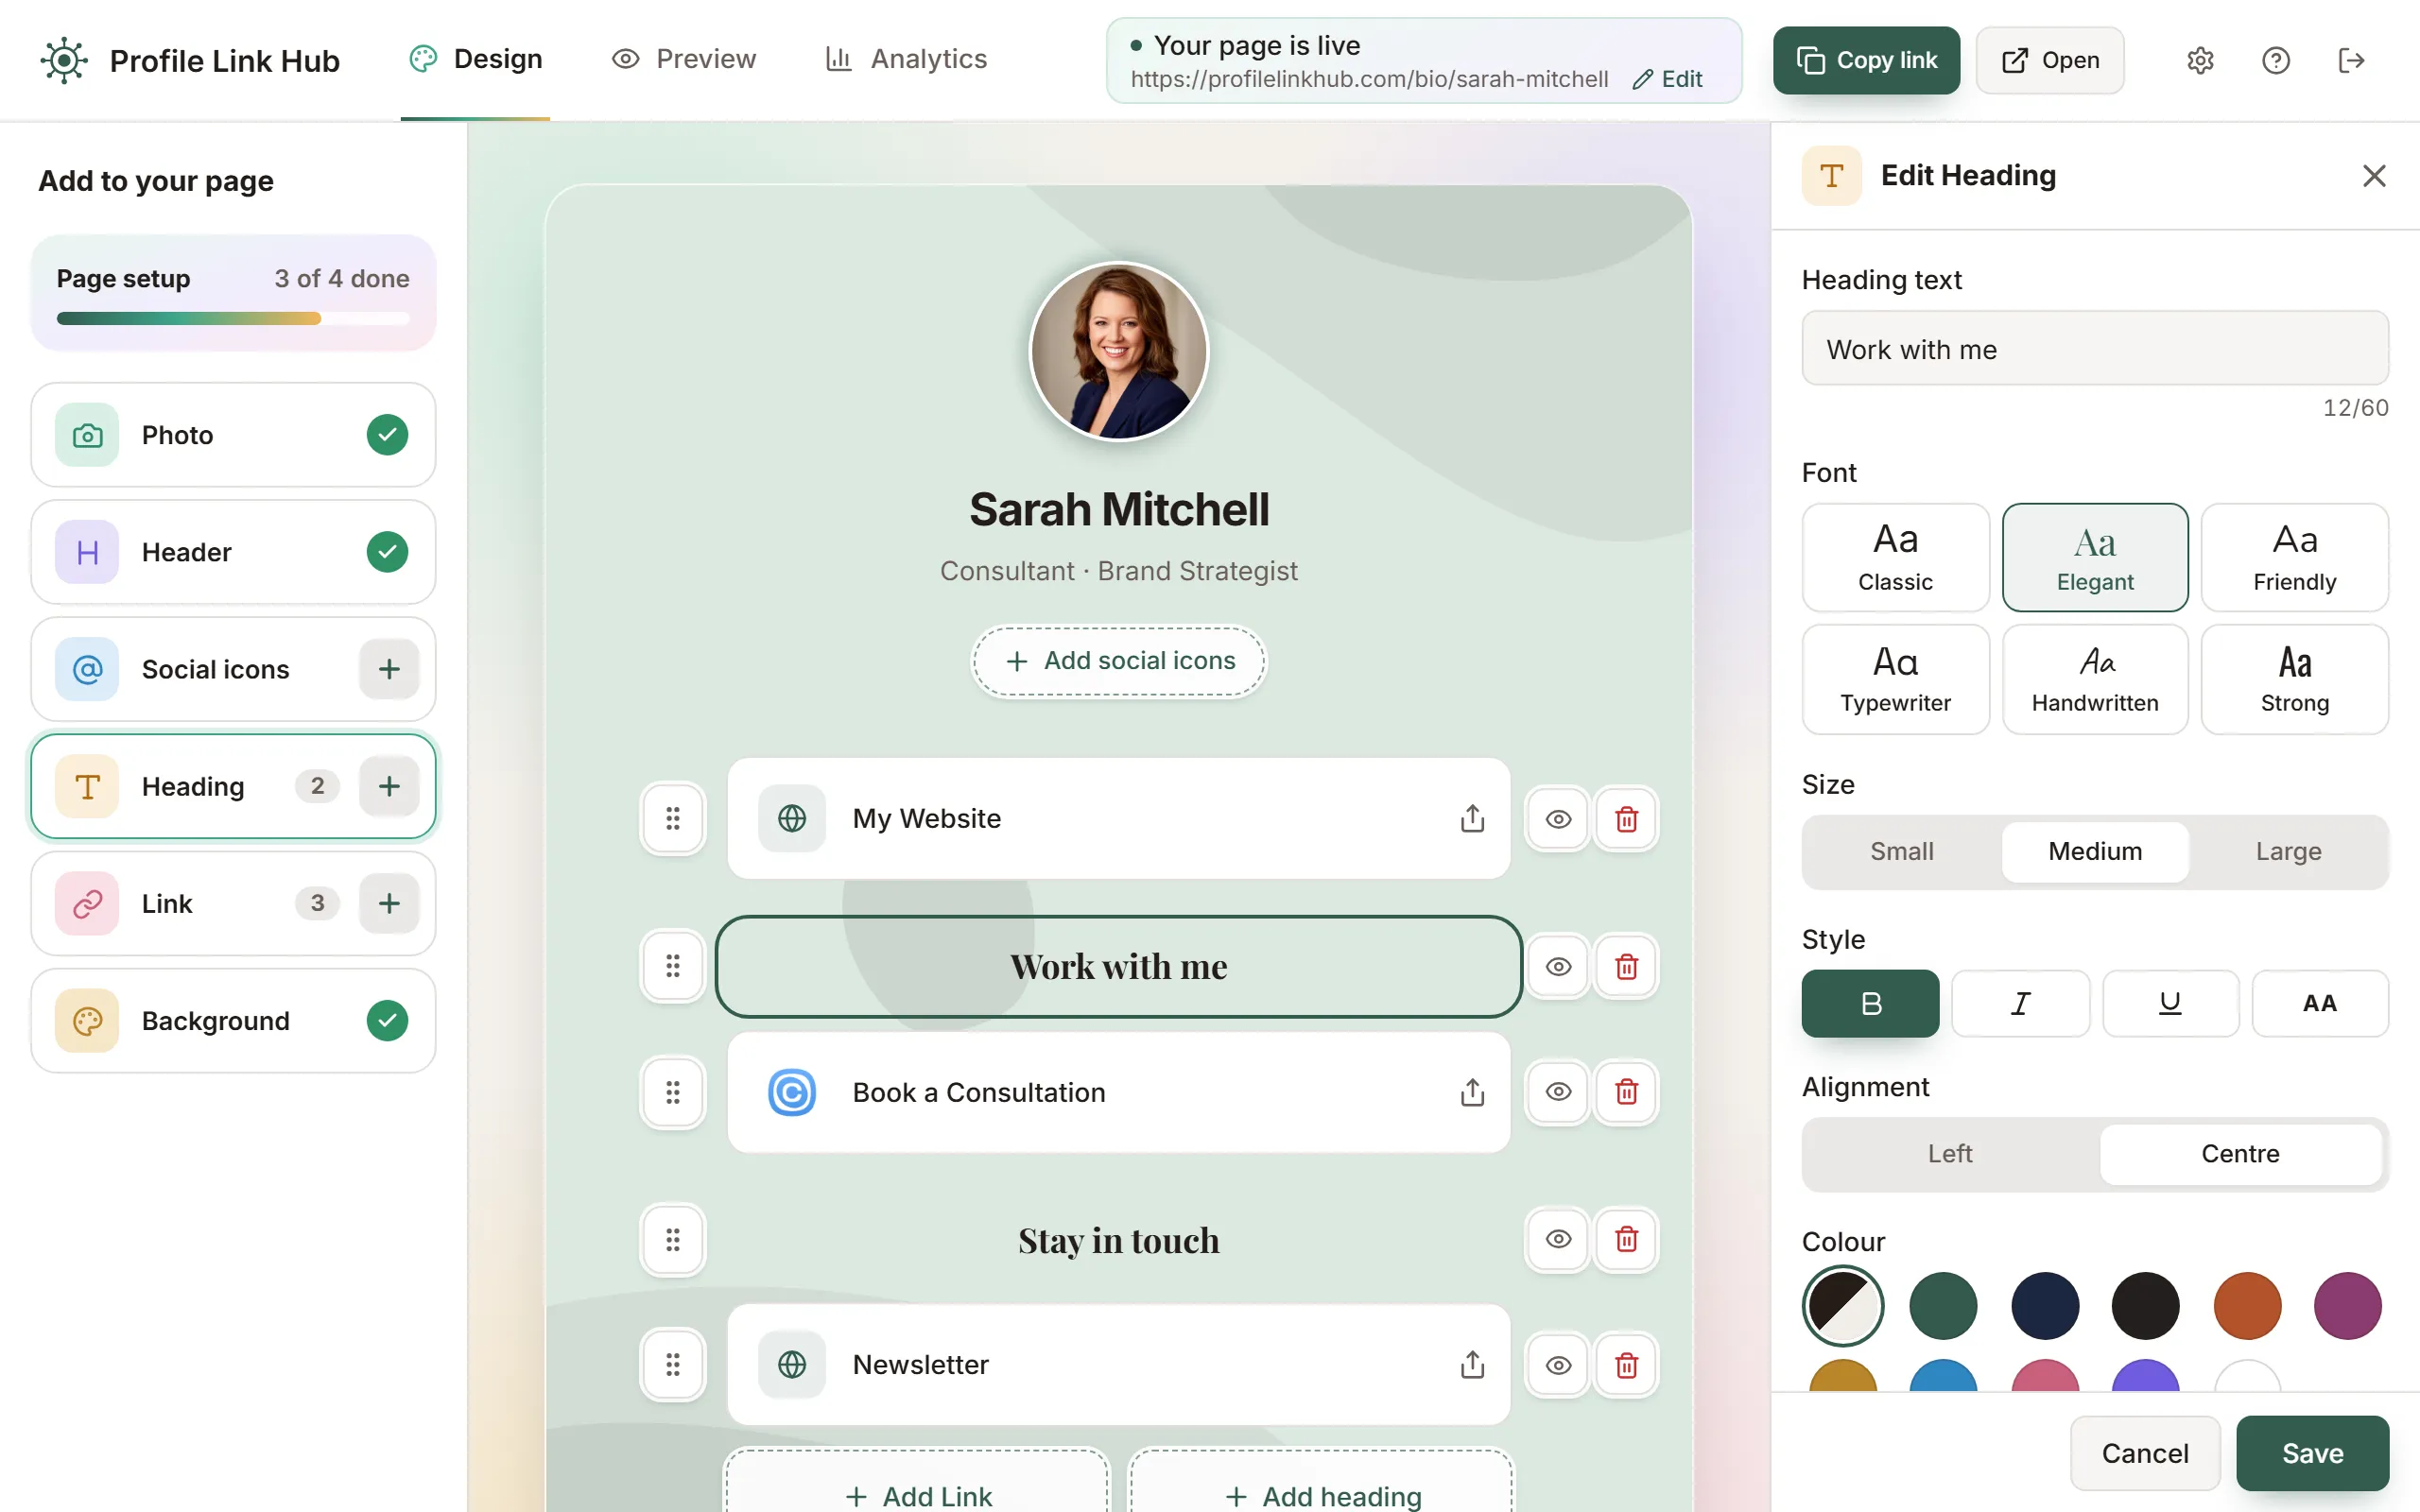
Group links with headings (optional)
A heading is a short line of text above a group of links, such as "Work with me" or "Free resources". It helps visitors find the link they came for on a page with many links. Headings aren't links: visitors can't click them, and they don't count in your link clicks.
- Click Add heading under your links, or the + next to Heading on the left. The Add New Heading panel opens and an empty heading appears at the end of your list.
- Type it under Heading text (up to 60 characters).
- Pick its look: a Font, a Size, Bold, Italic, Underline or All caps, the Alignment, and a Colour. Page text follows your background: dark on light backgrounds, light on dark ones. For your brand colour, type its hex code under Custom colour. Your page changes as you pick.
- Click Save, then drag the heading by its handle (the six dots) above the links it belongs to.
To change a heading, click it. Hide or delete it the same way as a link: with the eye and bin beside it on a computer, or Show on page and Delete in its sheet on a phone.
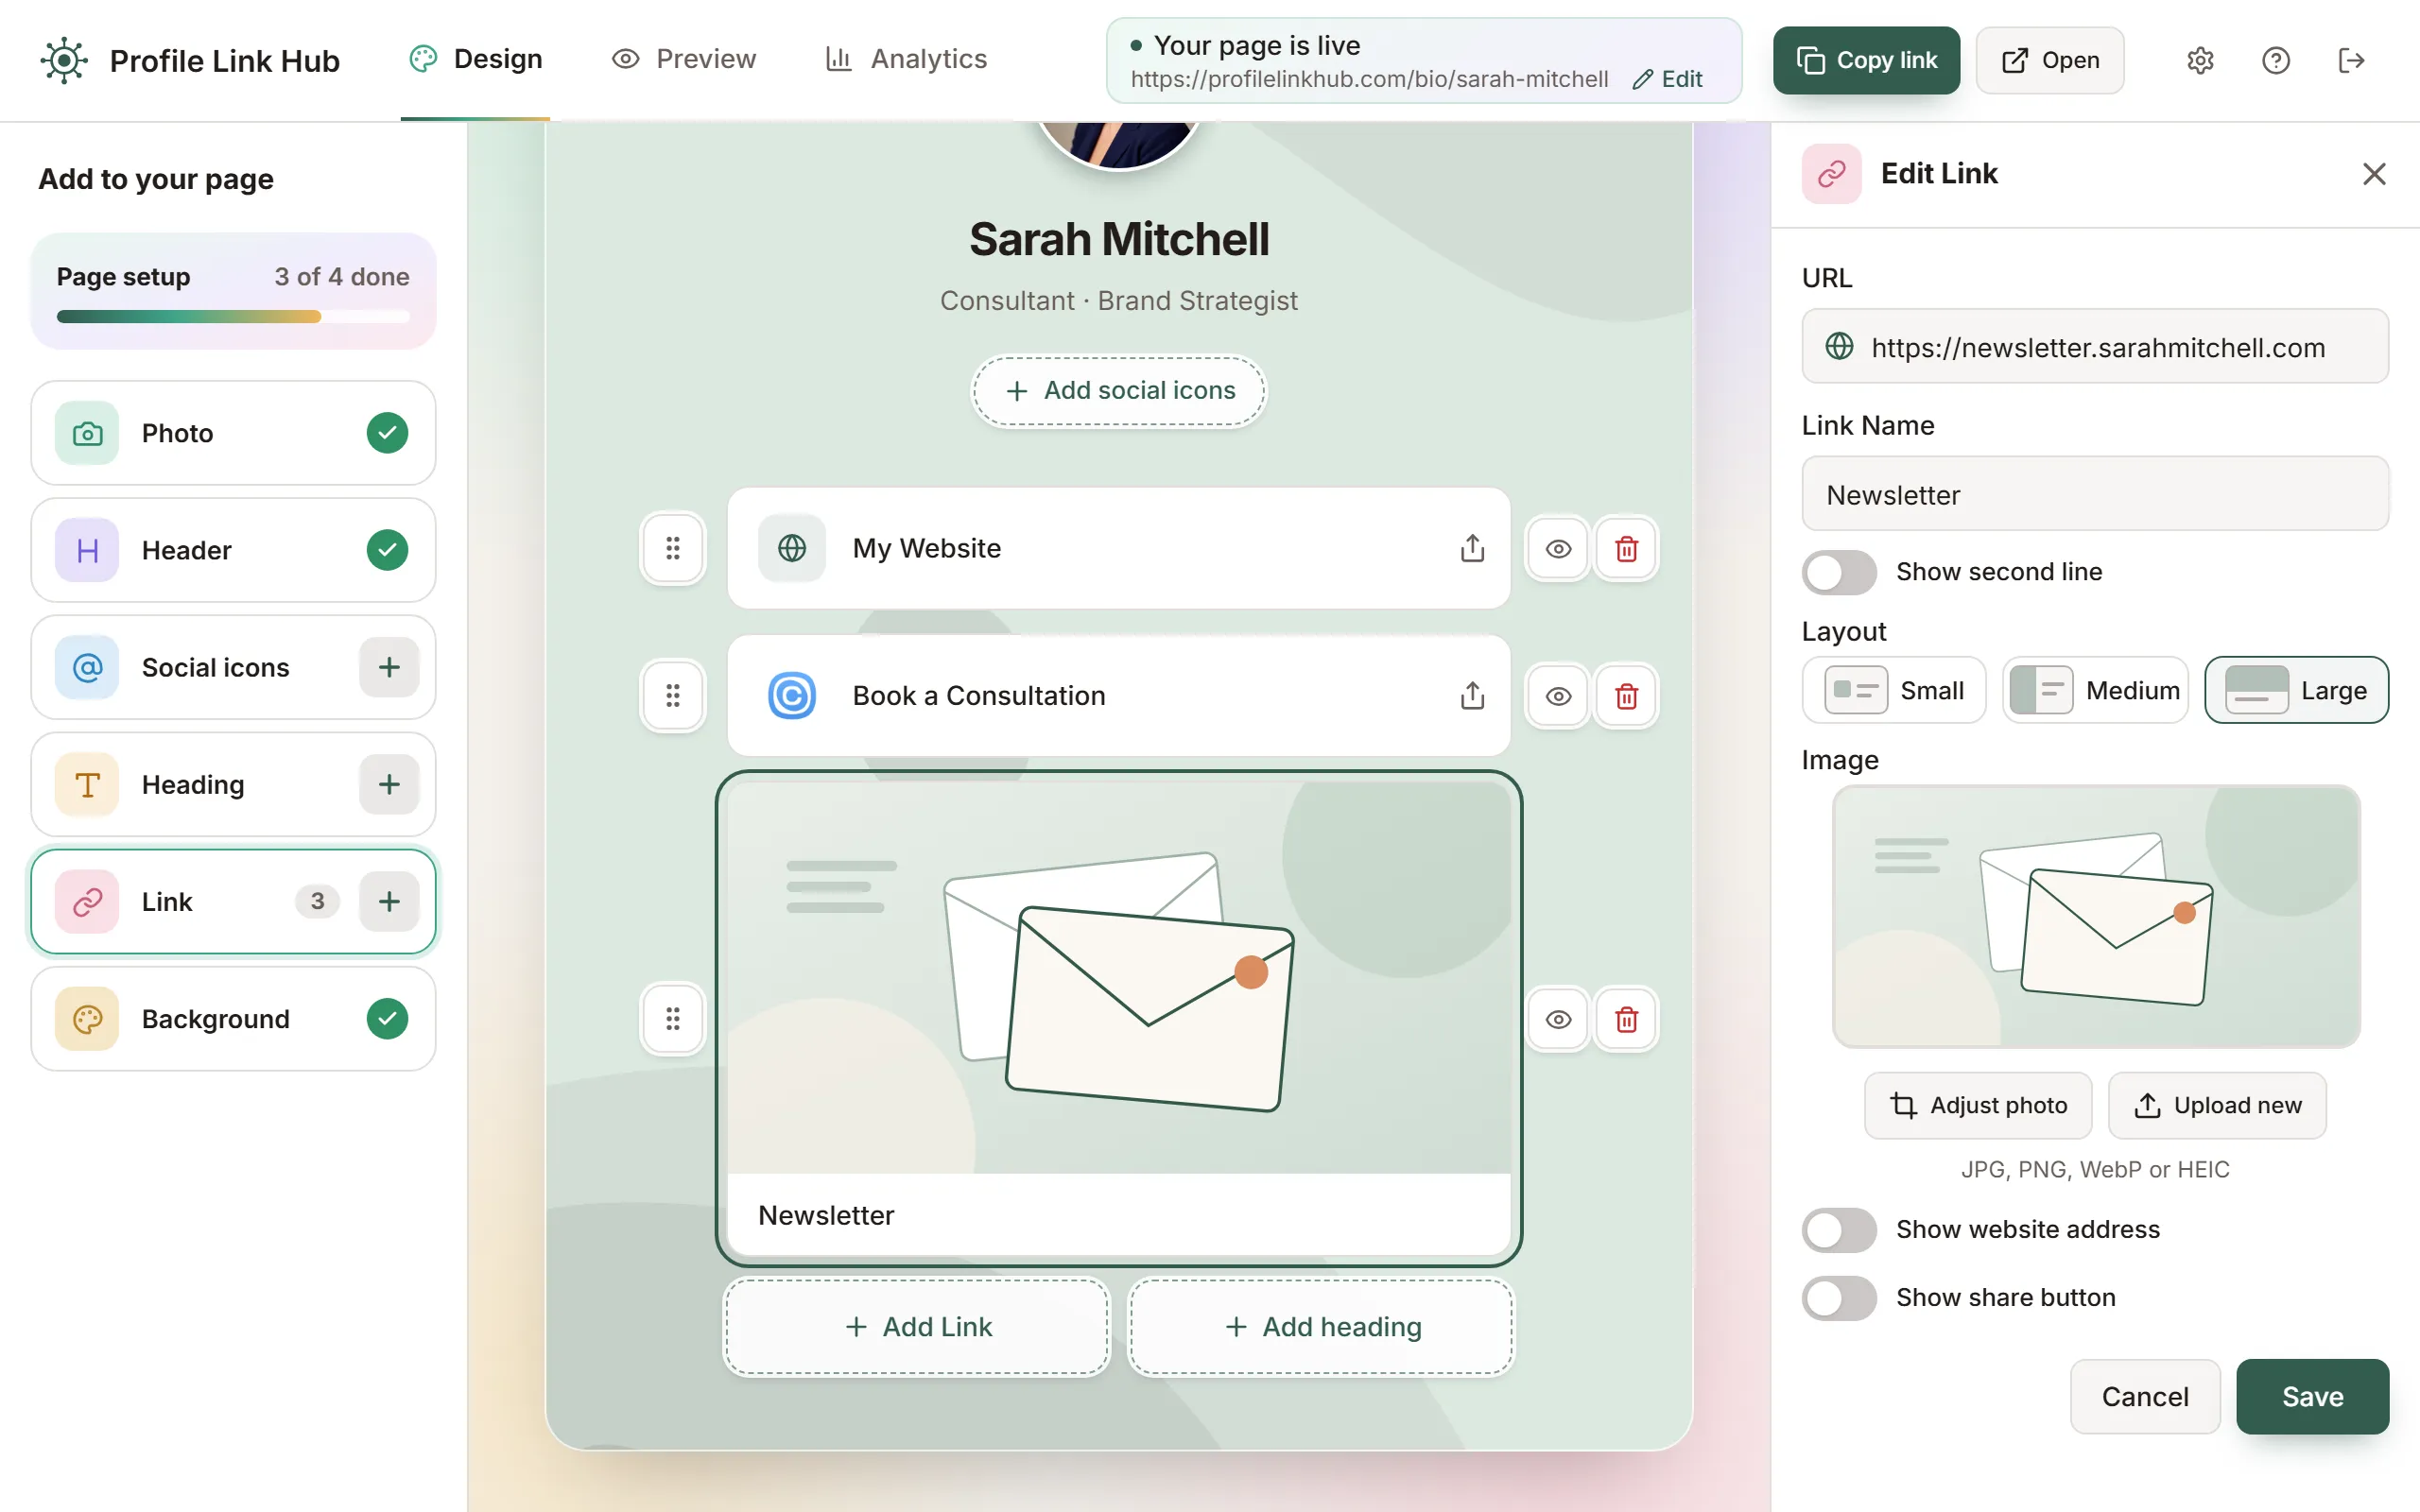
Make a link bigger with a picture (optional)
To make one link stand out, like your shop, your newest offer or your newsletter, give it a picture:
- Click the link to open Edit Link.
- Under Layout, choose Medium (the picture on the left of the link, the default for new links) or Large (the picture across the top).
- Under Image, you see the picture the linked page shows when it's shared on LinkedIn or WhatsApp. To show only part of it, click Adjust photo, drag the picture and zoom, then click Done. To use your own picture instead, click Upload new (JPG, PNG, WebP or HEIC). If the page has no picture, the link shows its icon until you upload one with Upload photo.
- Optional: turn on Show website address to show the site's name under the text.
- Click Save.
Medium and Large links start without a share button; turn on Show share button to add it. Each layout keeps its own crop, and if you switch back to Small, the link shows its icon again and your picture is kept for later.
Add social icons (optional)
Social icons are small icons for your profiles (LinkedIn, Instagram, TikTok, YouTube, email and more), shown in a row under your sub-header.
On a computer, you add icons one at a time:
- Click Add social icons under your sub-header, or the + next to Social icons on the left. An empty circle appears in the row on your page.
- On the right, pick the platform. For a site that isn't in the list, pick Custom links.
- Type just your username: the rest of the address is already filled in. You can also paste a full profile link; only the username is kept. For a custom link, type its name and address and choose an icon, or upload your own.
- Click Save. To add more, click the green + at the end of the row. A page can have up to 12 icons.
To change an icon, click it in the row. The eye and bin to the right of the row hide or delete the icon you've selected; the same Show on page switch and Delete are on the right too.
On a phone:
- Tap Add social icons under your sub-header. The Social icons panel opens on Platforms.
- Pick every platform you use. For a site that isn't in the list, use Custom links and press + once for each one.
- Tap Next. On Handles, type just your username for each platform.
- Tap Save.
To reorder the icons, drag them along the row on your page. To put the row above your name instead, drag its handle (the six dots) up. On a phone, press and hold first, then drag.
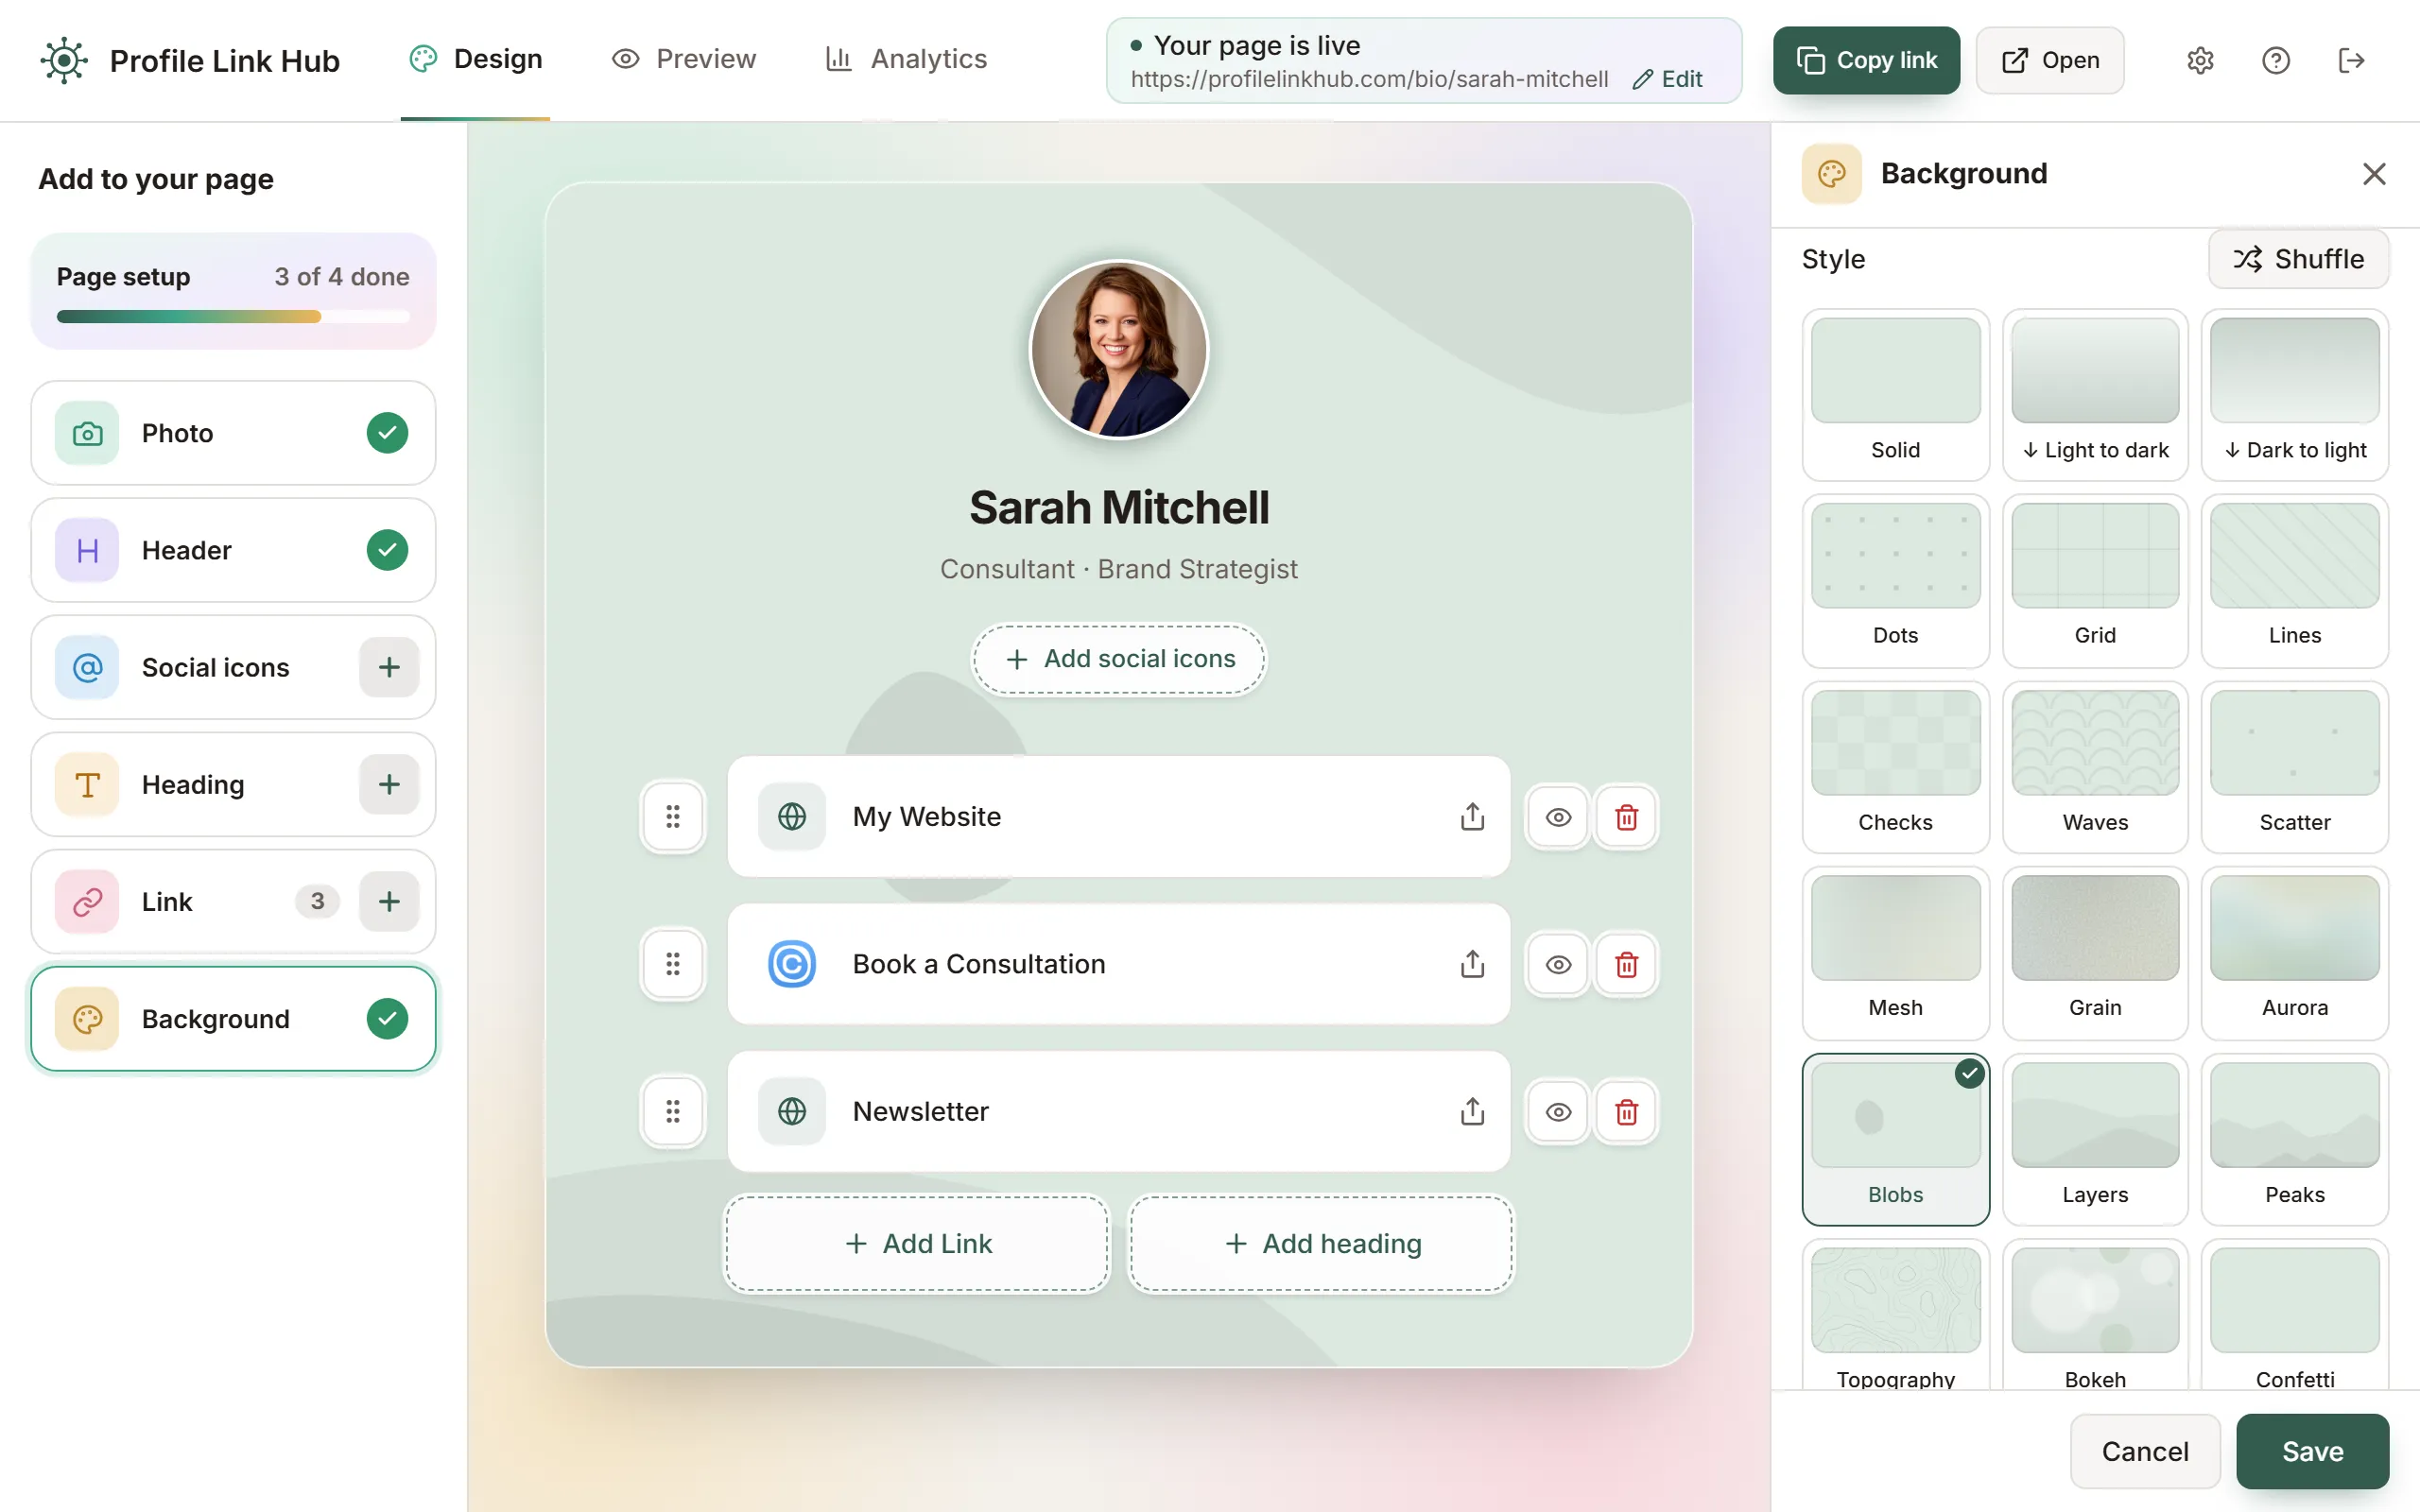
Change your background (optional)
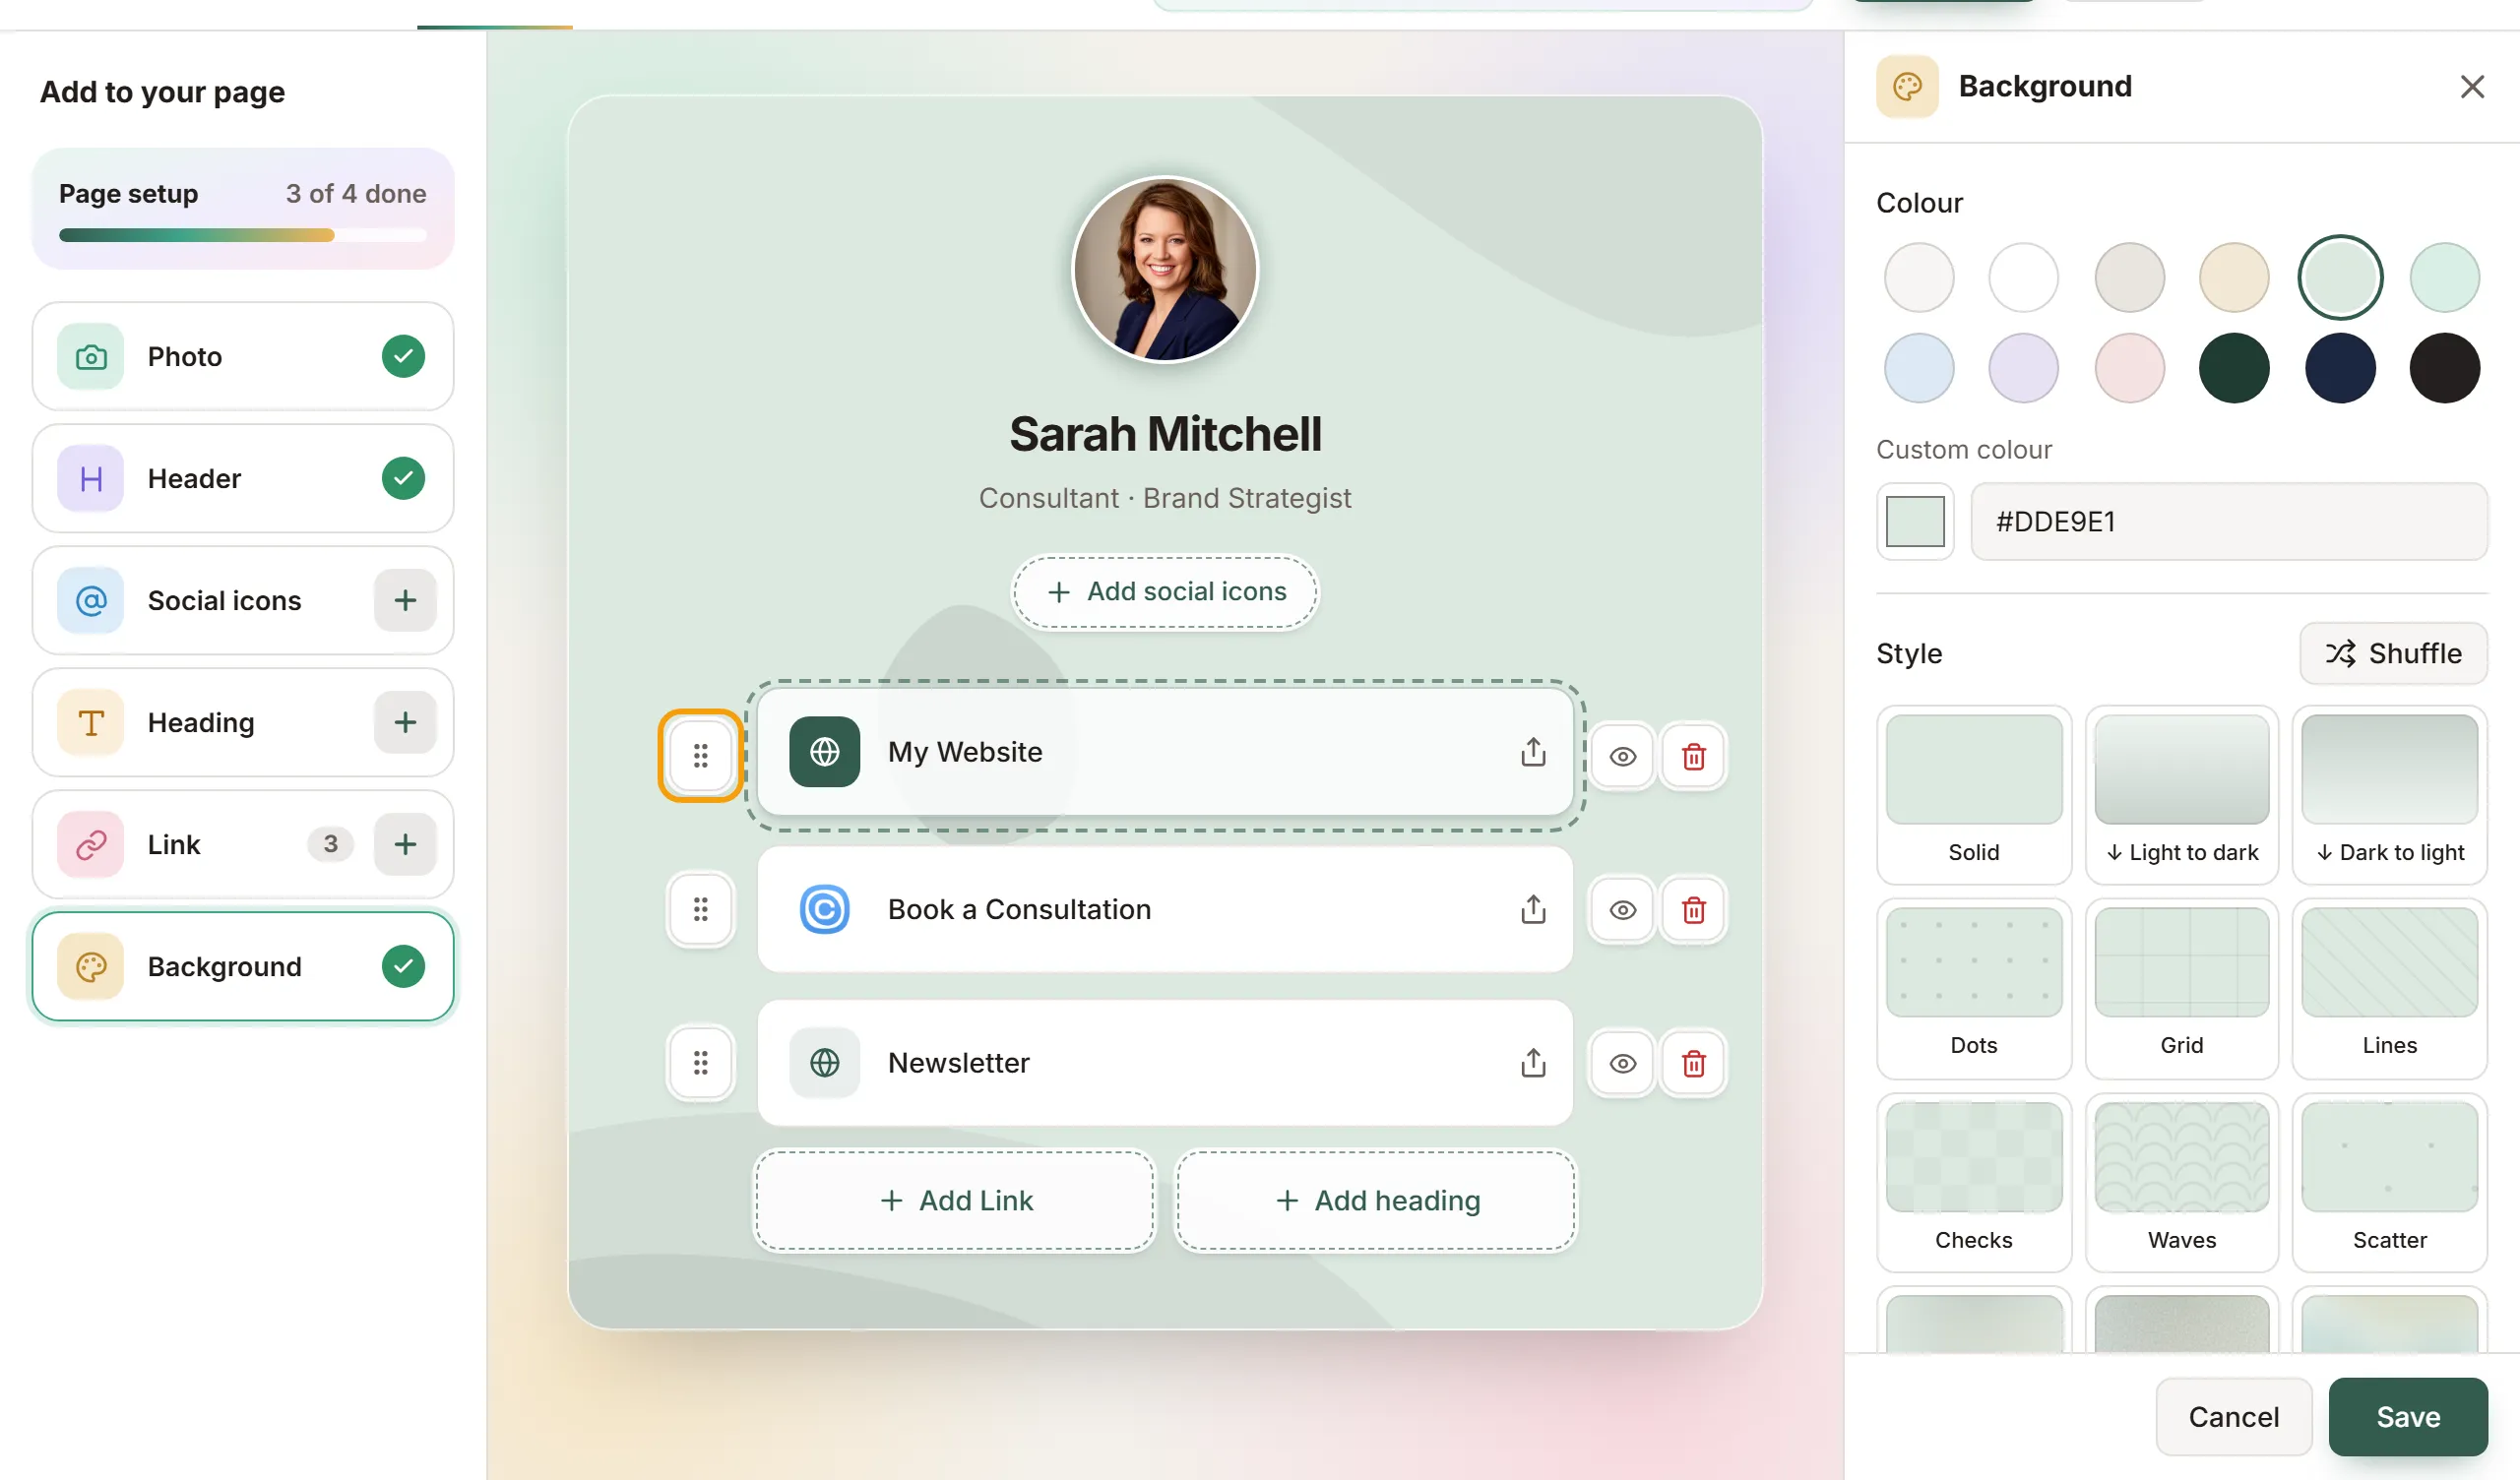
- Click Background on the left (on a phone, at the top of your page), or click any empty part of the page. The Background panel opens.
- Under Colour, pick a colour. For your brand colour, type its hex code (for example #1C2740) under Custom colour.
- Under Style, pick solid, a gradient (light to dark, or dark to light, from top to bottom), a subtle pattern, or a drawn style such as Mesh, Aurora, Blobs or Topography. Every style is shown in your colour, and your page changes as you pick. Drawn styles have a random layout: click Shuffle until you like it, and your page keeps that layout once you save.
- Click Save.
On a dark colour, your name, sub-header and icons turn light so they stay easy to read. Your link buttons stay white.
6. Check how visitors see your page
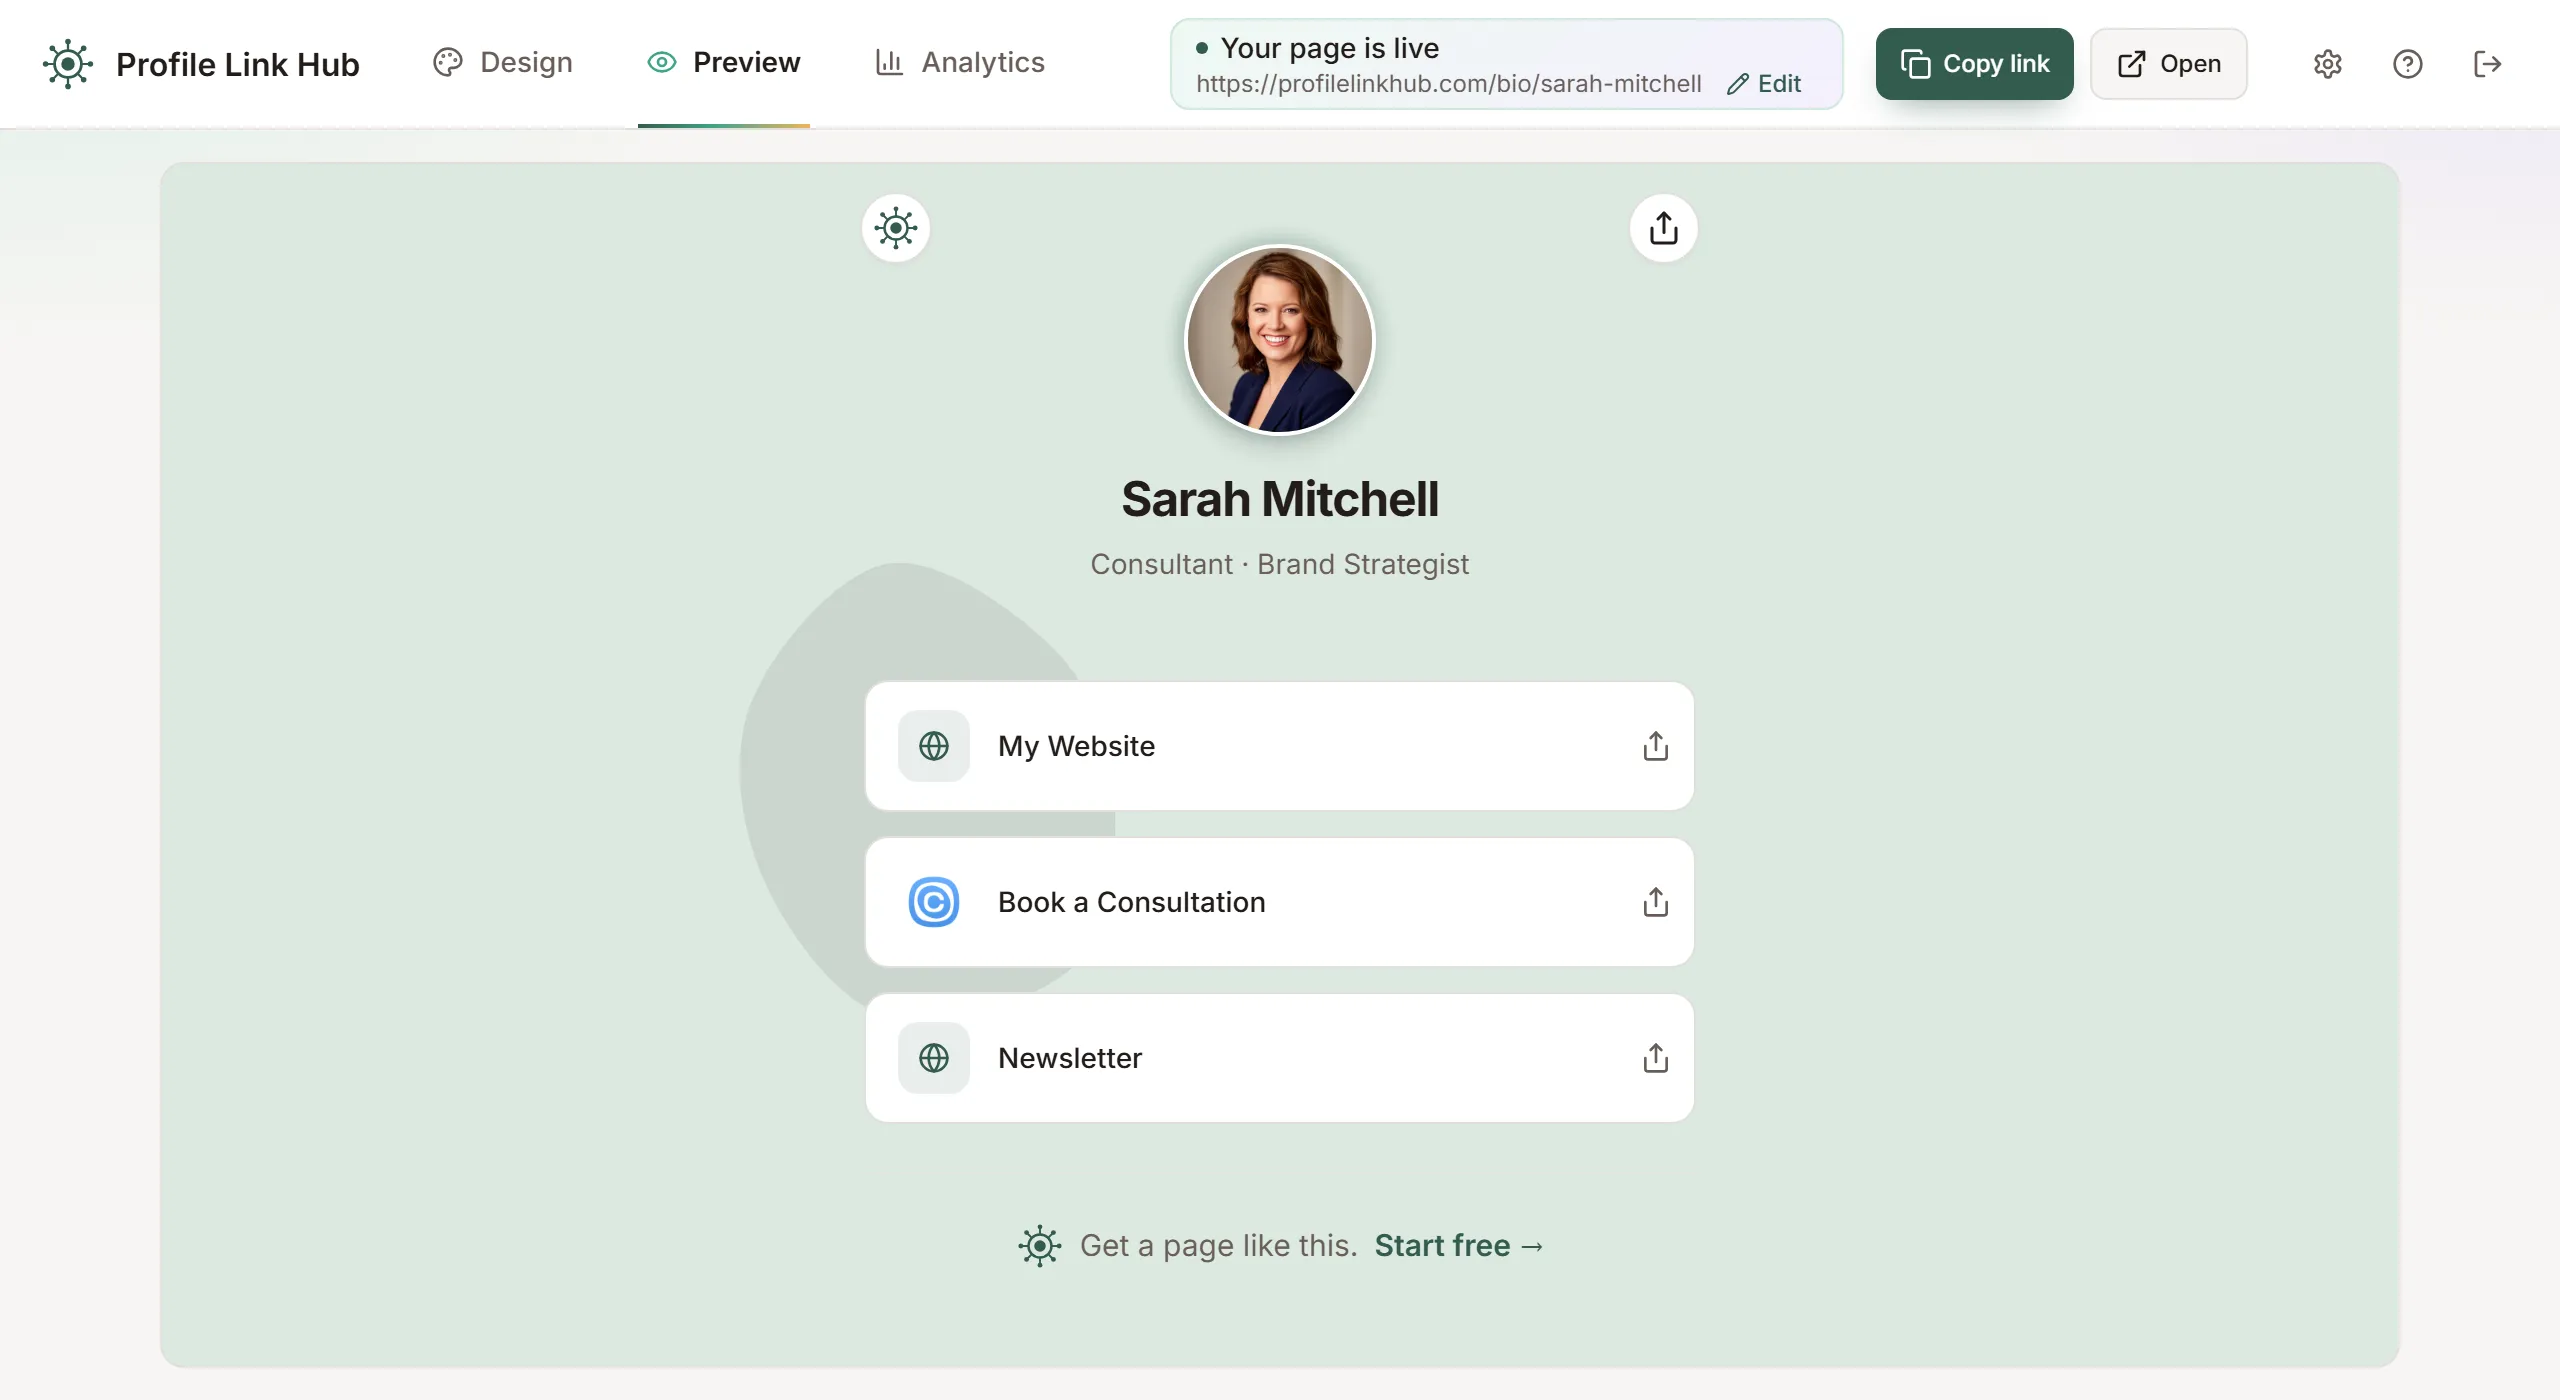
Open the Preview tab. It shows your page exactly as visitors see it, without the editing buttons, links you haven't saved, or anything you've hidden. Switch back to Design to make more changes.
7. Choose your page address (optional)
Your page address is made from your name when you sign up. To change it:
- Click Edit next to your page address. The Customize your link window opens.
- Type the address you want after
profilelinkhub.com/bio/. You'll see Available when nobody else has it, plus a few ideas you can pick instead. - Click Save link.
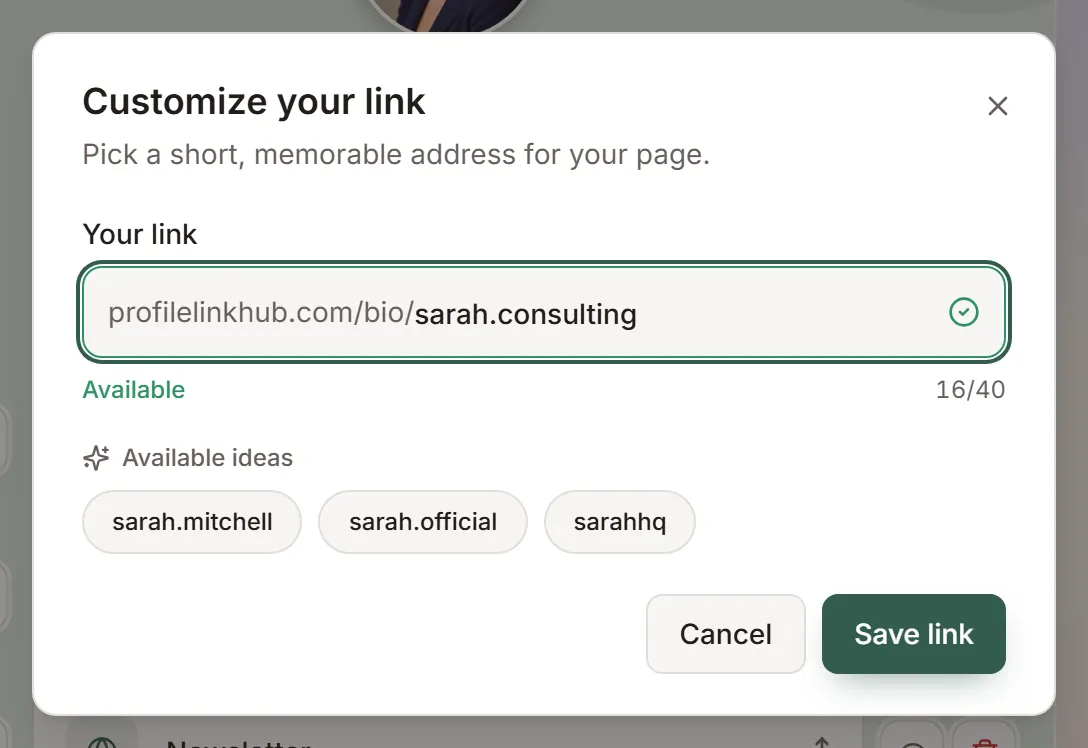
A few rules: addresses are 3 to 40 characters, use letters and numbers with single dots or hyphens between them, and you can change yours up to 5 times in 30 days. When you change it, your old address stops working right away and someone else can take it, so pick your address before you share your page.
8. Share your page
Click Copy link to copy your page address, then paste it wherever people find you: your LinkedIn profile, your Instagram or TikTok bio, your email signature. On a phone, use Share to send it straight to an app. Click Open to see your live page in a new tab.

Visitors can share too. Each link on your page has a share button at its end: it opens a share sheet for that one link (copy it, or send it on LinkedIn, WhatsApp, X or email), the same sheet as the share button at the top of your page. Try it on the Preview tab. You can turn it off for any link with Show share button.
For where to put your link on LinkedIn, see how to add multiple links to your LinkedIn profile. To understand what a page like this can hold, read how to put multiple links in one link.
About this guide
The screenshots come from a demo account on the current version of the ProfileLinkHub dashboard. They're taken automatically from the app and re-taken whenever the dashboard changes, so what you see here matches what you'll see when you sign in.
Frequently asked questions
Do I need to create my bio page separately after signing up?
No. ProfileLinkHub creates your page when you sign up, at profilelinkhub.com/bio/ followed by your name. A short setup then helps you add your username, links, photo and background, and you can change all of it later from the Design tab of your dashboard.
Can I skip the setup?
You can skip every setup step except choosing your username. Anything you skip, you can add later on the Design tab of your dashboard.
Is my page public before I add any links?
Yes. Your page address works from the moment you sign up. Until you add a link, visitors see your name, your sub-header and the message "No links published yet."
Do I need to publish my changes?
No. Each change is live on your page as soon as you press Save. Use the Preview tab to see the page the way visitors see it.
Can I hide a link without deleting it?
Yes. On a computer, click the eye to the right of the link on the Design tab; on a phone, tap the link and turn off Show on page. The link stays in your dashboard, marked Hidden, but visitors don't see it until you show it again. Social icons can be hidden the same way.
Can I change my page address later?
Yes, up to 5 times in 30 days, from the Edit button next to your page address. Your old address stops working right away and someone else can claim it, so update it anywhere you shared it.
Still stuck?
Contact support and we'll help you set up your page.